
Fudgy brownie bites topped with whipped chocolate ganache are a crowd-pleasing mini dessert for any party! These elevated, two-bite brownies are easy to bake from scratch, and the taste and texture is 1,000 times better than store bought brownie bites.

"I made these for my book club Christmas party and they were a big hit... This will be my new go-to brownie recipe. Even without the ganache they're the best brownies I've ever eaten." - Brenda, ⭐️⭐️⭐️⭐️⭐️
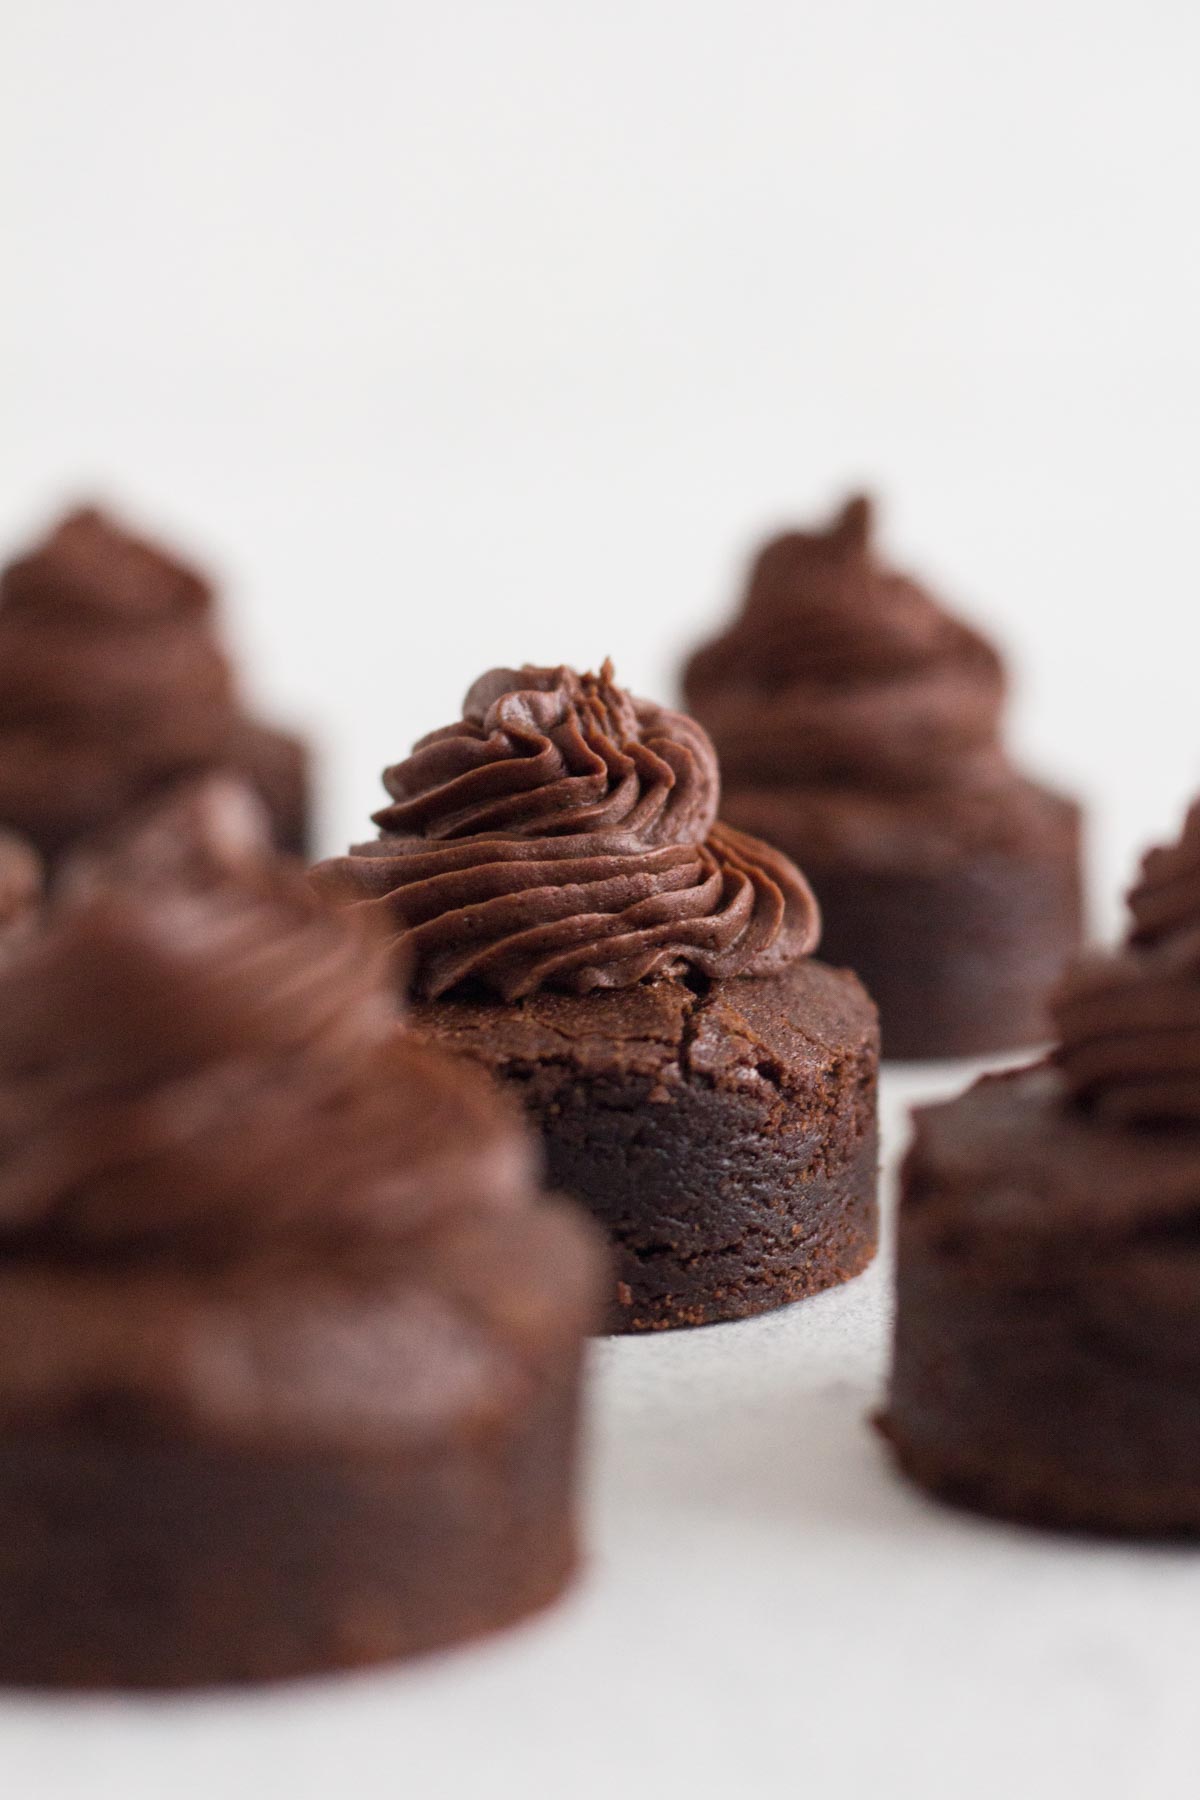
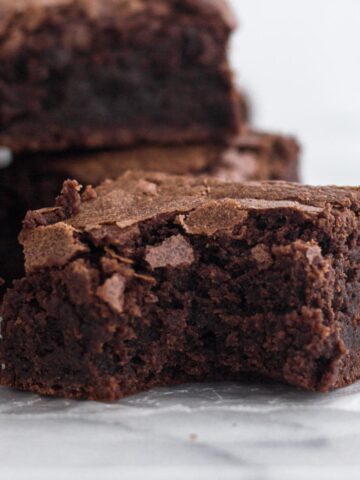
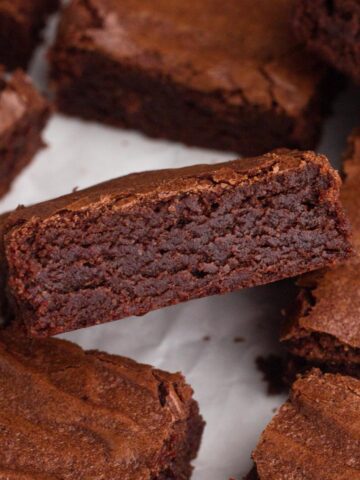
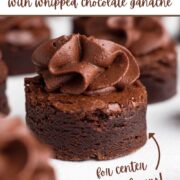
Since a picture is worth 1,000 words, I don't think that these brownie bites need much of an introduction. I mean, do you see those decadent, fudgy brownies? Are you drooling over the swirls of chocolate ganache?
To make this easy bite-sized dessert, I baked a tray of my favorite fudgy, one-bowl chocolate brownies and used a round cookie cutter to cut the brownies into mini brownie bites. Atop each brownie bite I piped rich and creamy whipped chocolate ganache.
If you're a center brownie person, who loves the fudgy centers and avoids the crisp edges, then say hello to your new favorite way to brownie!
And if chocolate on chocolate is totally your thing, then you don't want to miss my dark chocolate cake topped with chocolate ganache buttercream!
Jump to:
Ingredient Notes & Substitutions
See recipe card at the bottom of this post for full ingredient list and measurements.
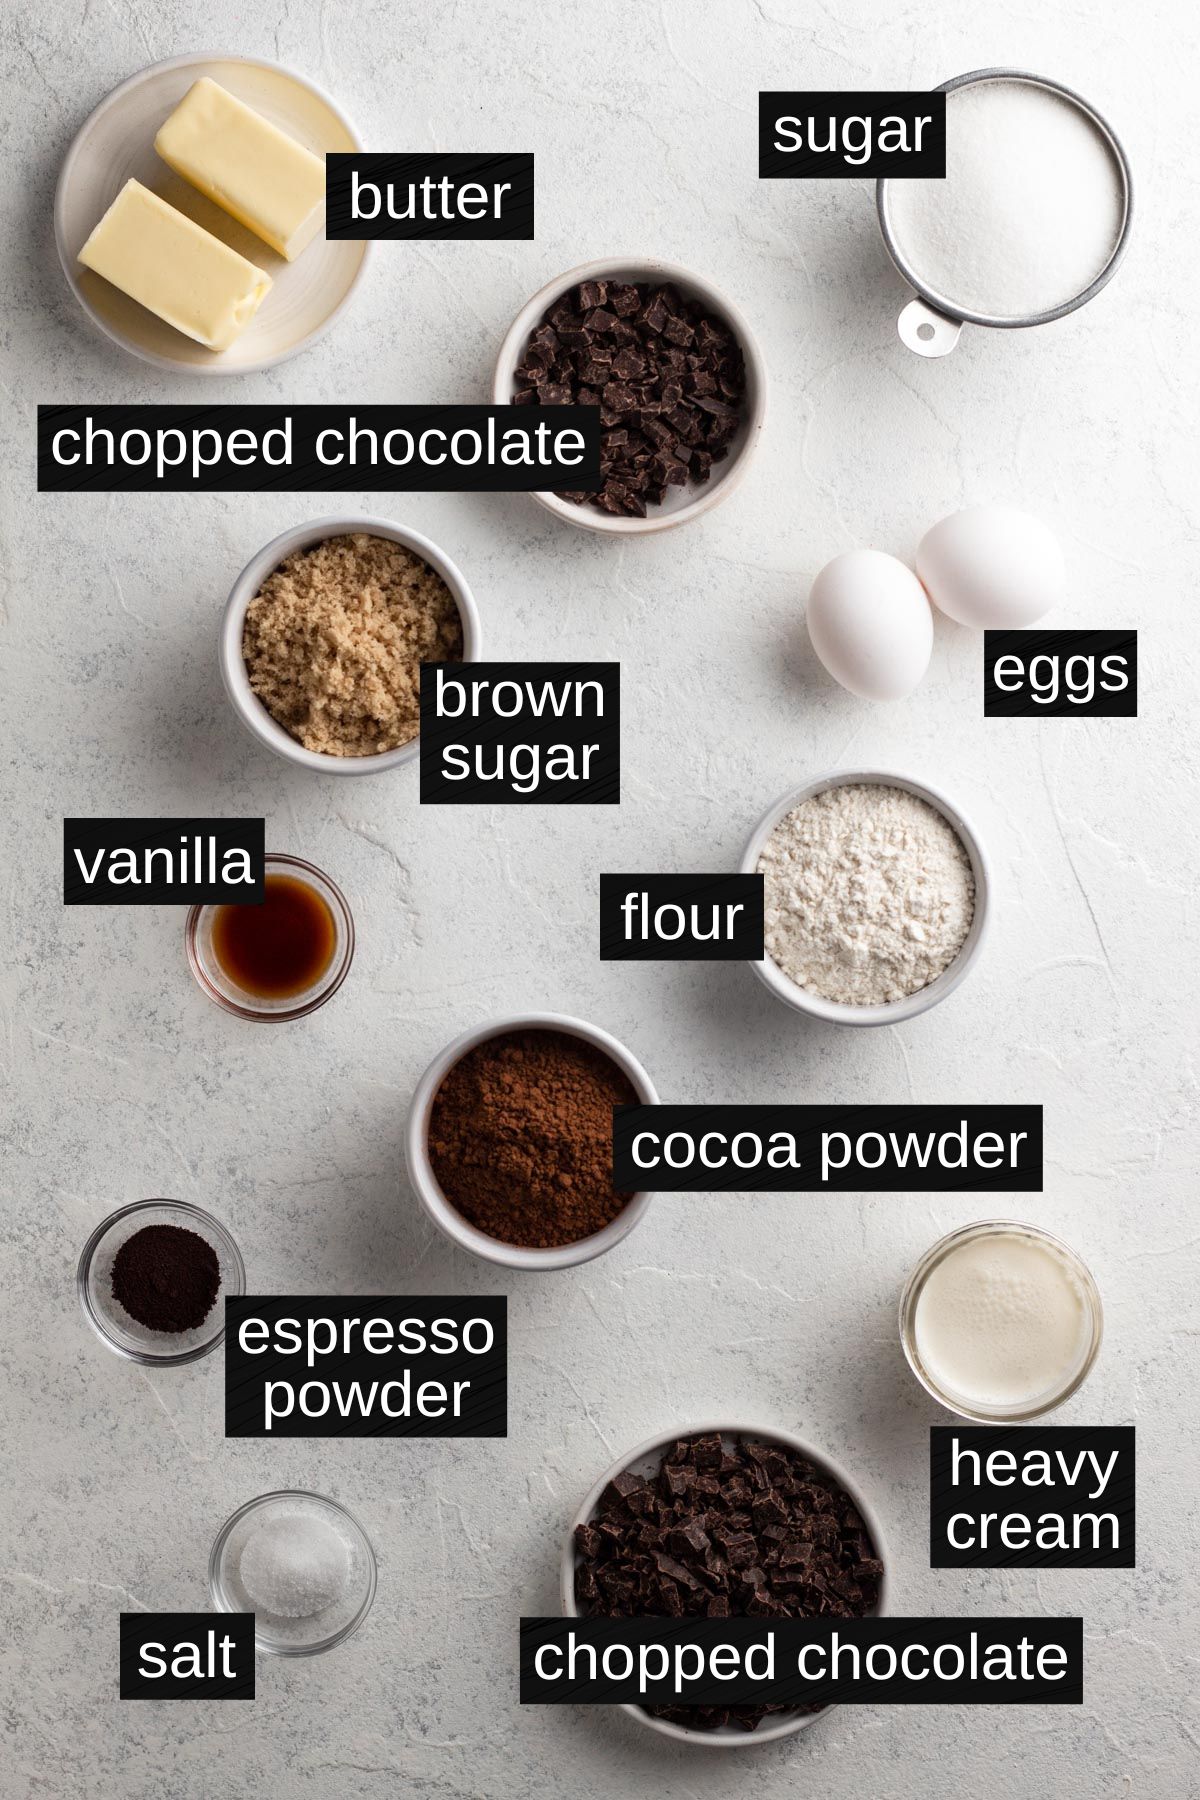
Semi-sweet Chocolate Baking Bar - Unlike chocolate chips, which include stabilizers, chocolate baking bars help to create an ideal texture for both the brownies and ganache. I like the balanced sweetness of semi-sweet chocolate for these brownies, but you could use milk chocolate (sweeter) or bittersweet chocolate (less sweet) if you prefer.
Light Brown Sugar - A bit of brown sugar, used alongside granulated sugar, adds an extra punch of flavor and moisture to the brownie batter.
Natural Unsweetened Cocoa Powder - Unsweetened cocoa powder works with the chopped chocolate baking bar to add rich chocolate flavor to these brownies. Natural unsweetened cocoa powder is the most common type of cocoa powder, and the kind you're most likely to already have in your pantry.
Espresso Powder - A little bit of espresso powder helps to amplify the chocolate flavor, making for an even richer brownie. This ingredient is optional, so feel free to leave it out if you prefer or if you don't have any on hand.
Heavy Cream - Heavy cream (or heavy whipping cream, they're the same thing!) is combined with chocolate in a 1:1 ratio to create the ganache. Don't substitute whipping cream, which has a lower fat content than heavy cream.
Special Equipment
In addition to essential baking equipment (like a mixing bowl and spatula), I recommend some special tools for making this recipe.
- And 8x8 metal pan, for baking the brownies.
- A 1 ½ inch round cookie cutter, for cutting the brownie bites.
- An electric hand mixer, for whipping the ganache.
Step-By-Step Recipe Instructions
See recipe card at the bottom of this post for detailed recipe instructions.
Step 1: Preheat the oven to 350°F. Line an 8"x8" metal baking pan with parchment paper and set aside.
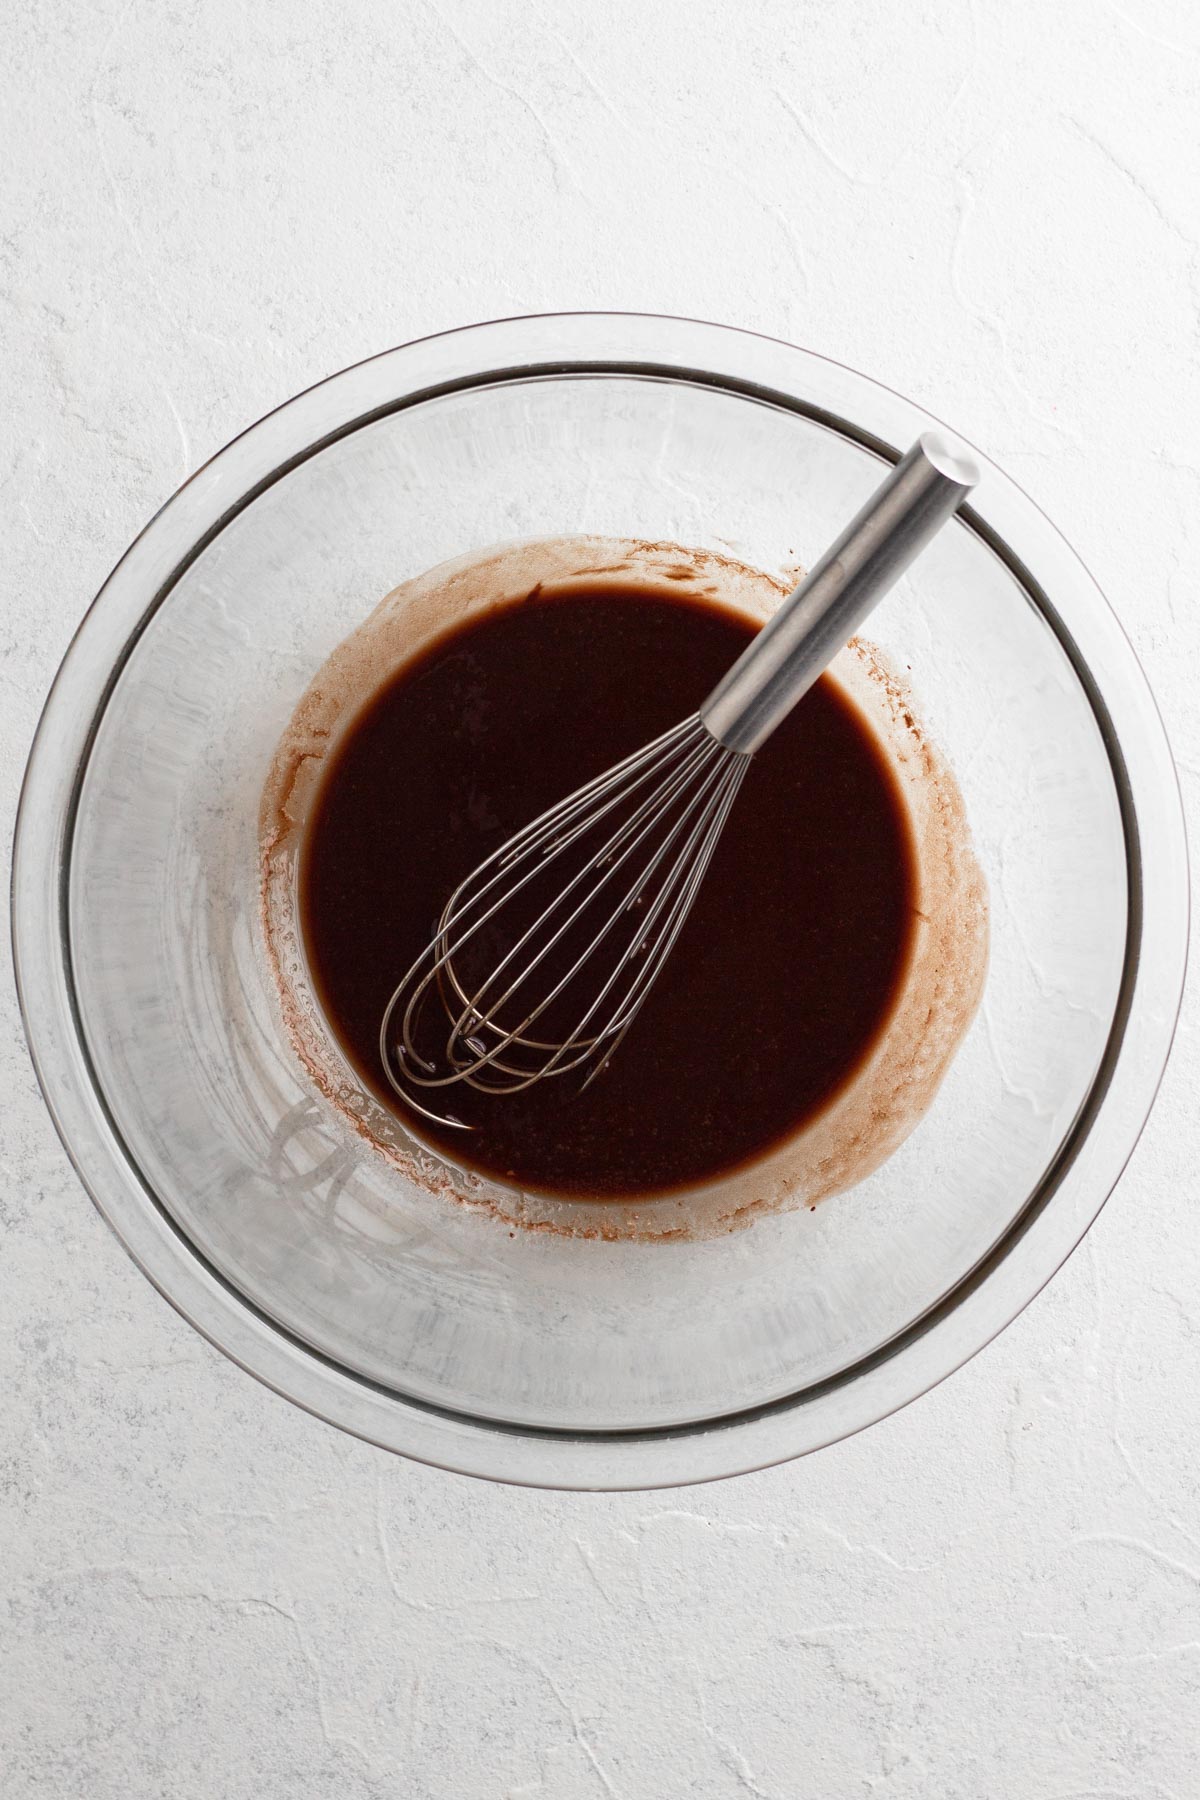
Step 2: Make the brownies. Melt butter and chocolate in the microwave in 15 second increments. Whisk until smooth.
Step 3: Add both sugars and whisk until combined.
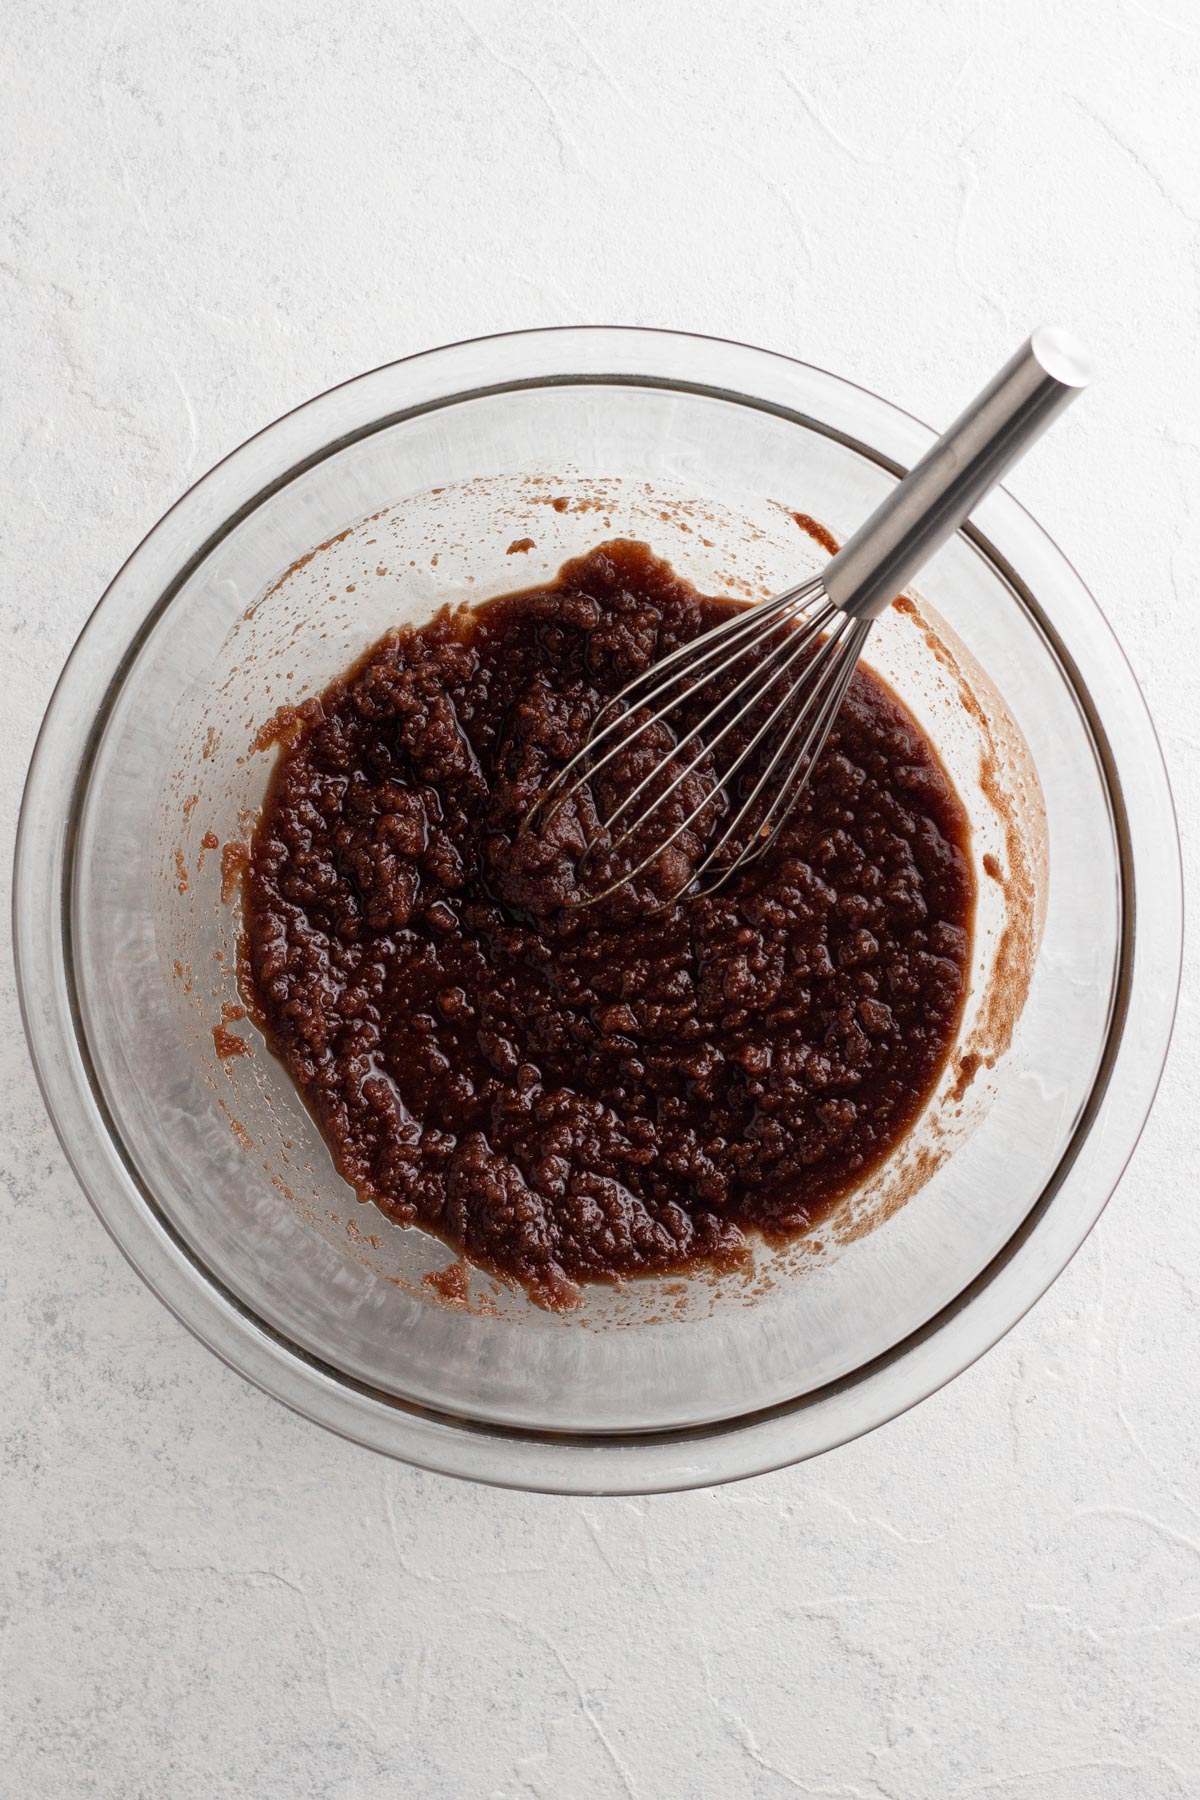
Step 4: Add vanilla and eggs and whisk until combined.
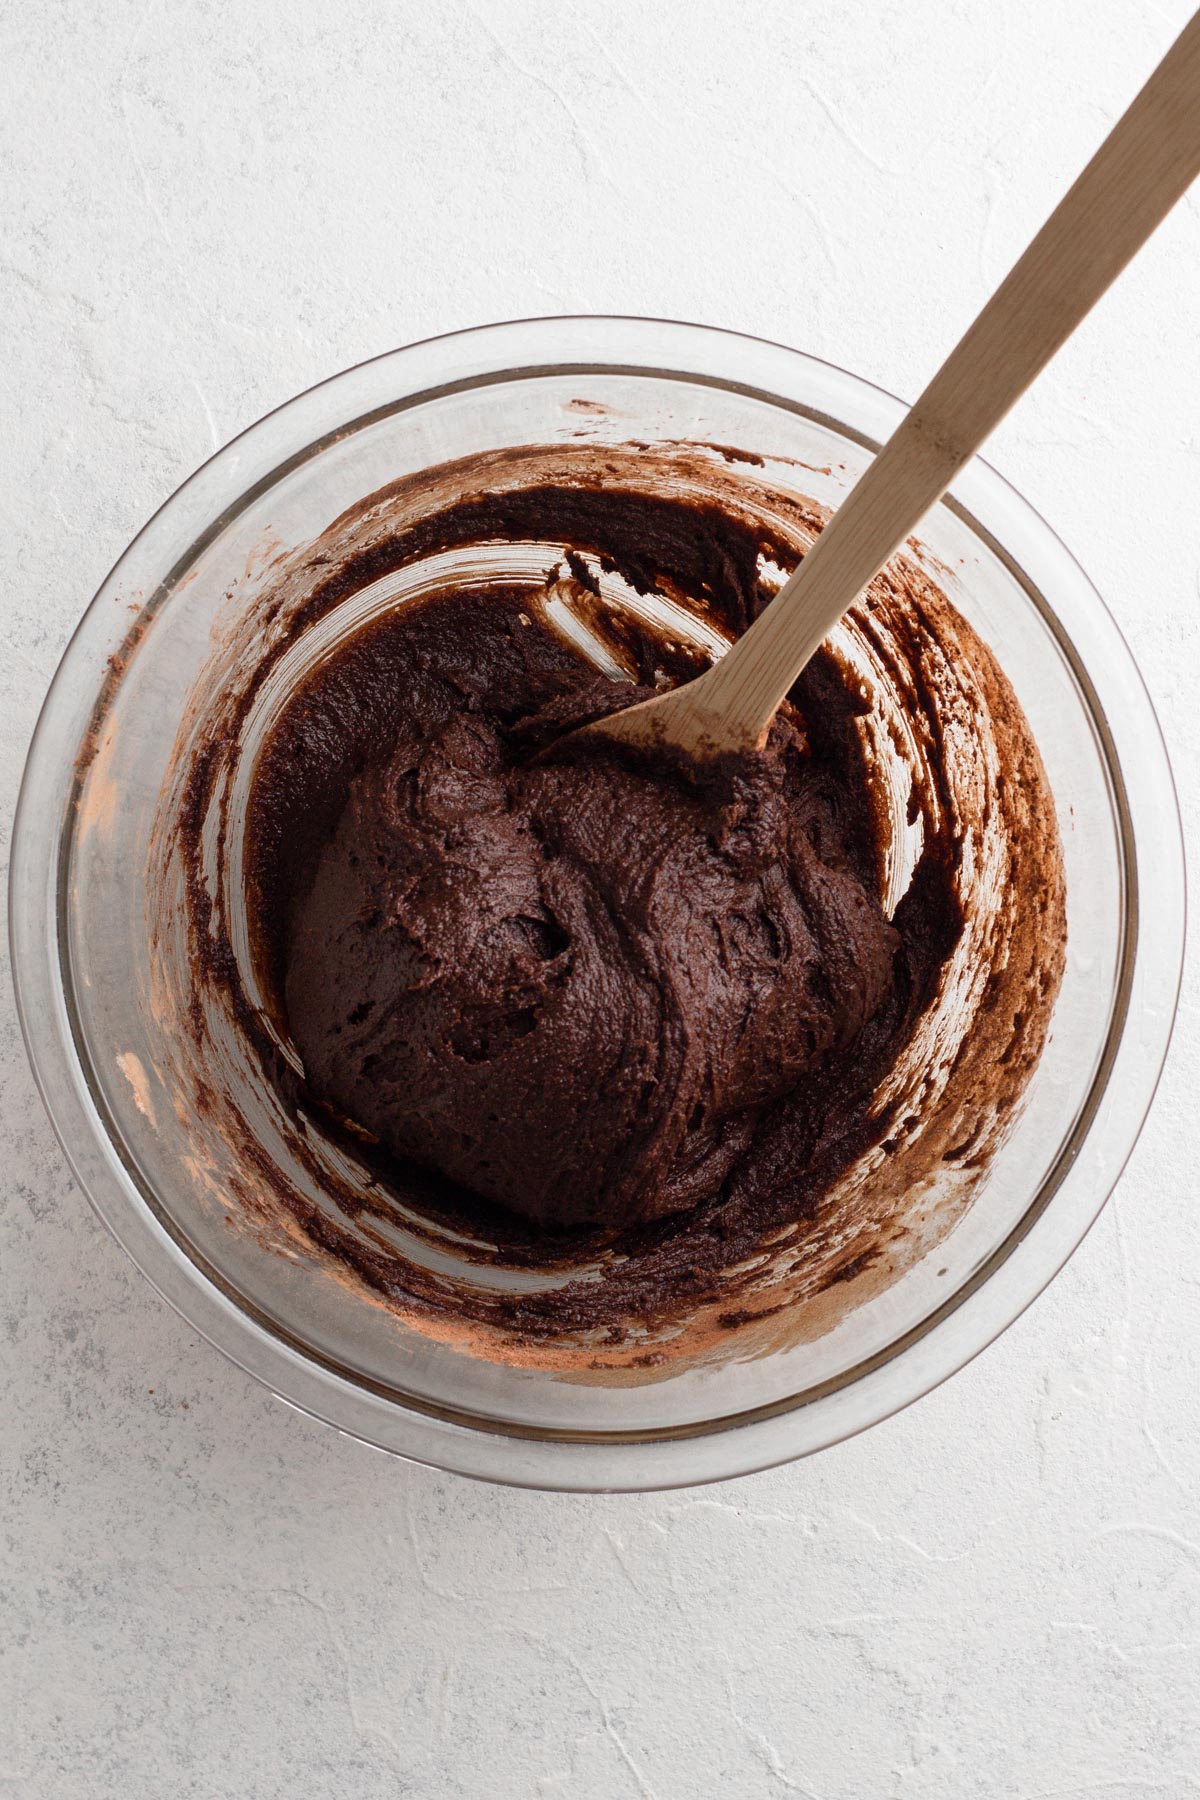
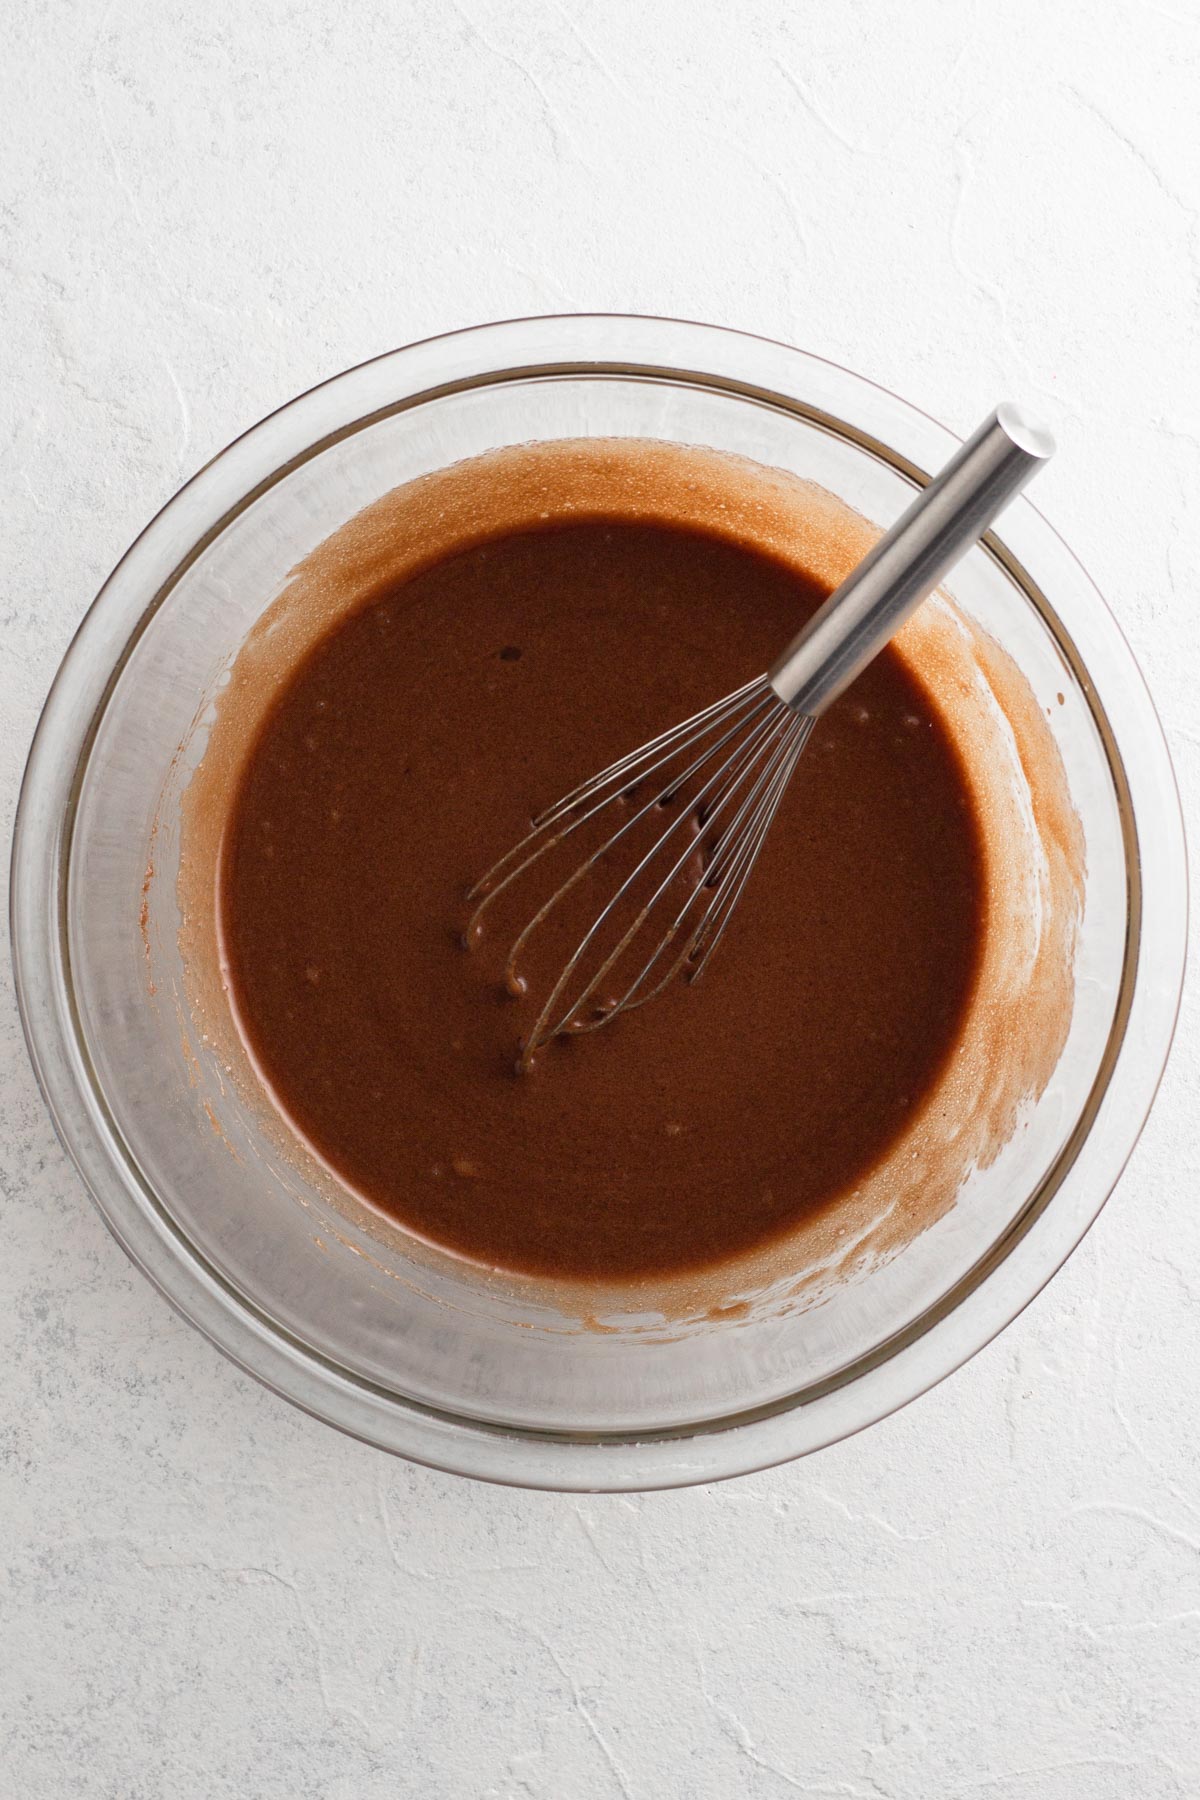
Step 5: Add flour, cocoa powder, espresso powder, and salt and fold into the sugar mixture.
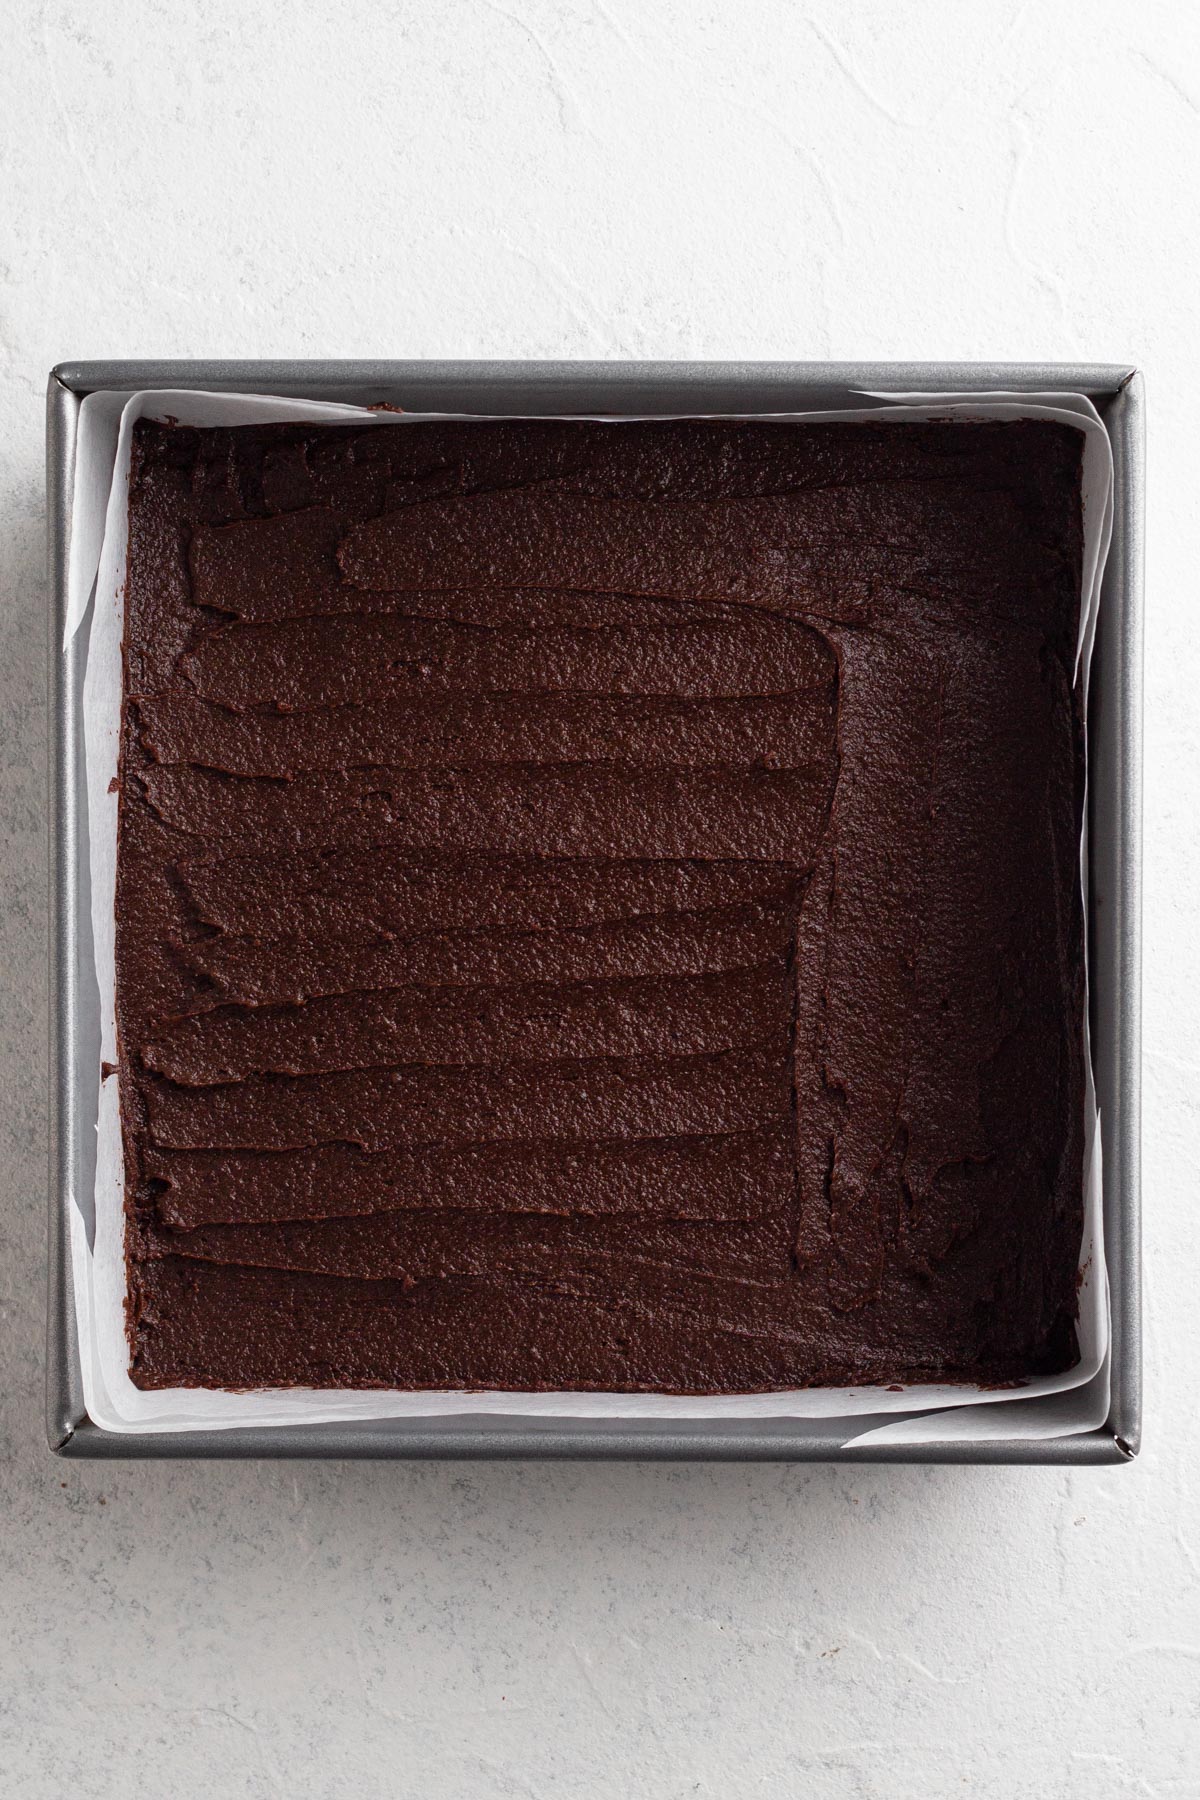
Step 6: Spread the batter into the prepared pan using a rubber spatula.
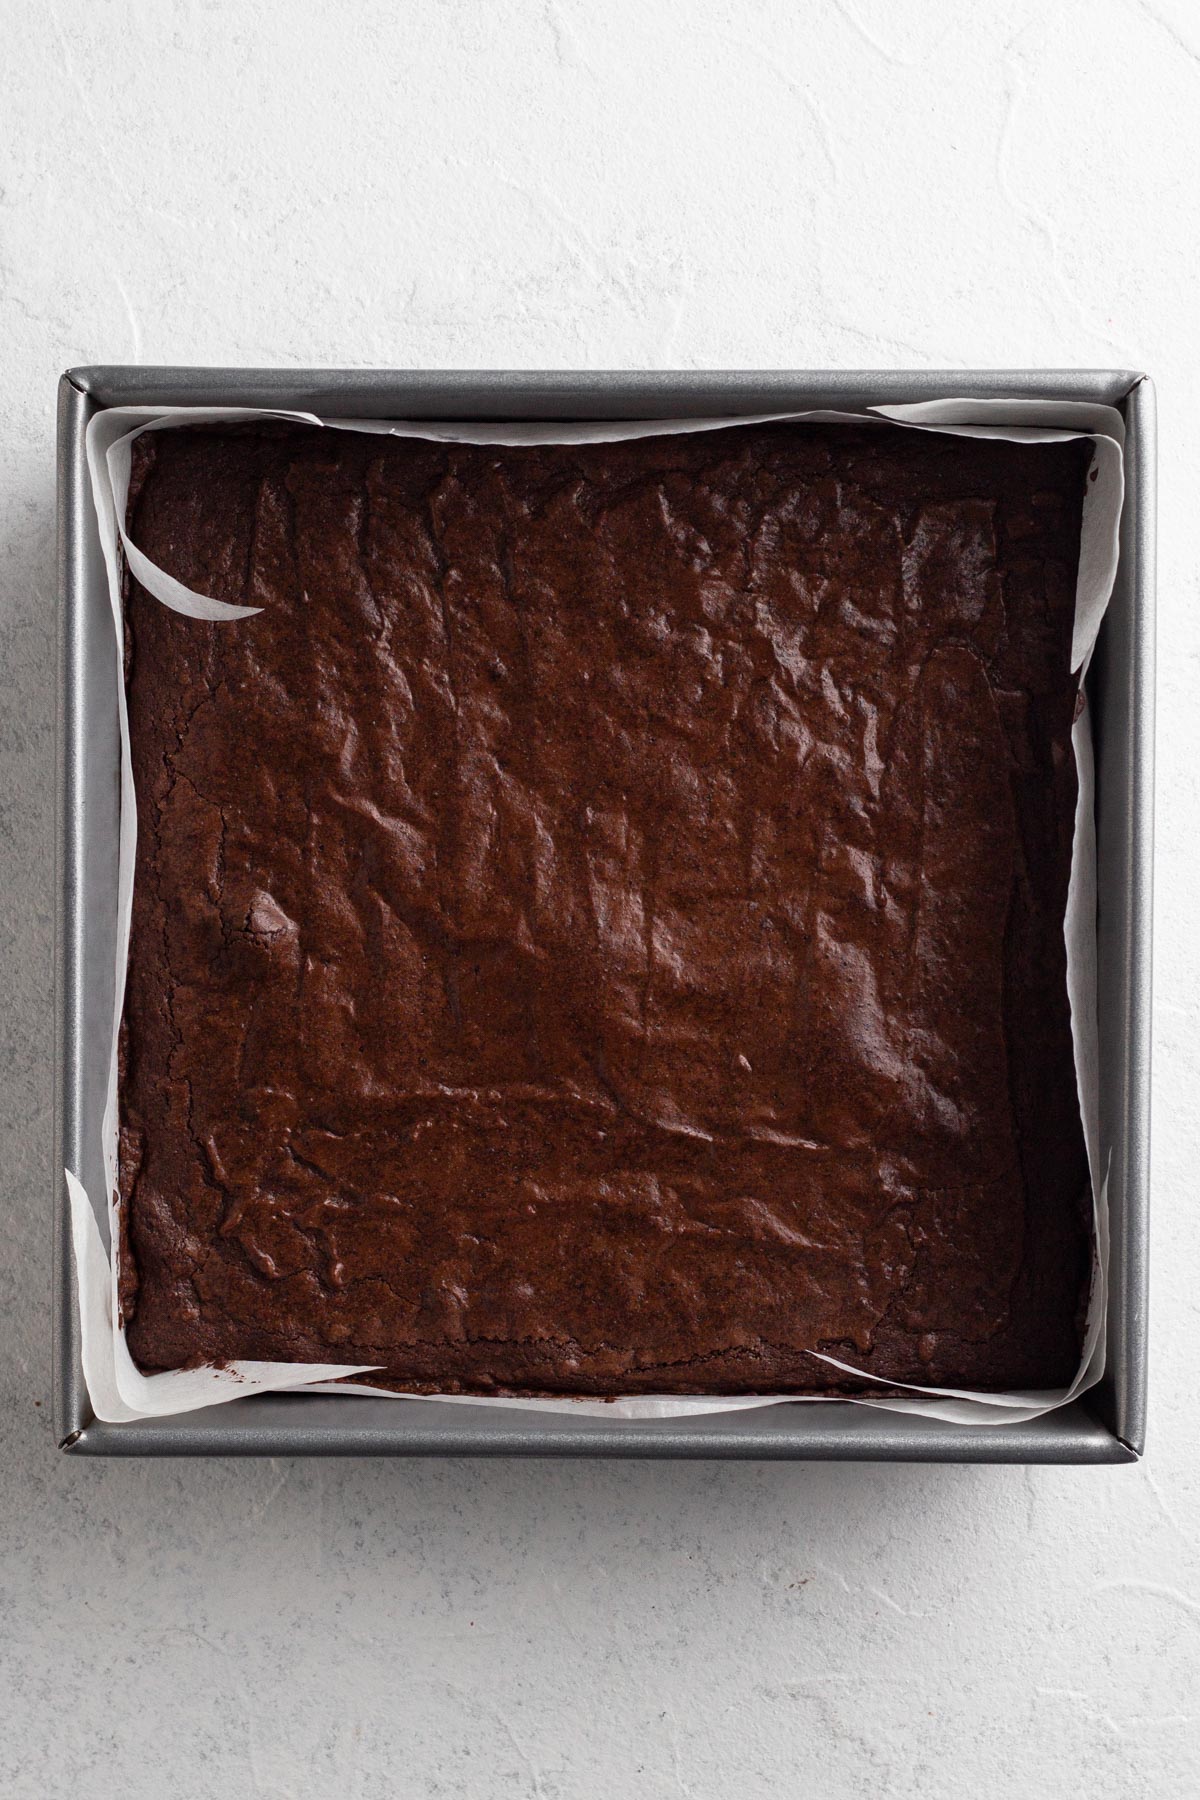
Step 7: Bake for 30-35 minutes. Let the brownies cool completely in the pan.
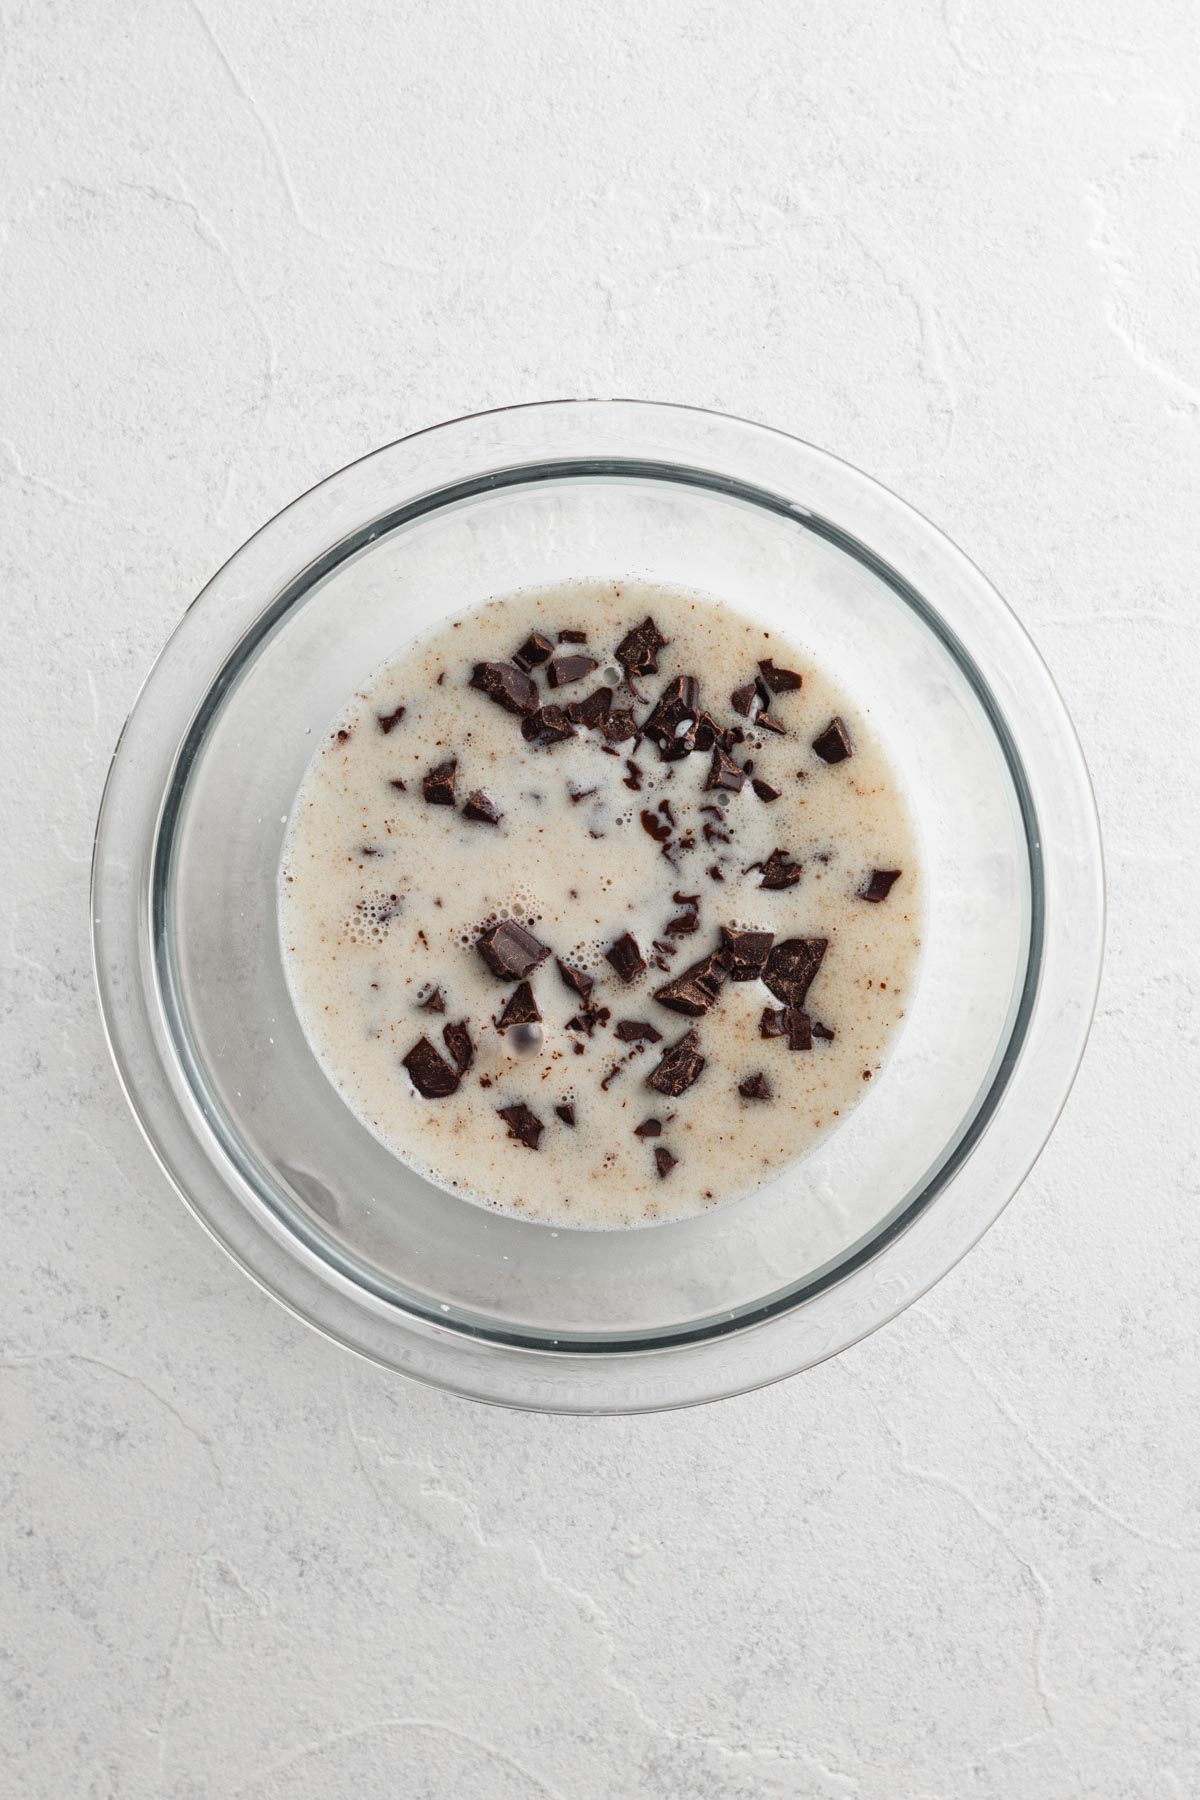
Step 8: When brownies are completely cool, make the chocolate ganache. Place chopped chocolate in a heatproof bowl and set aside. Heat heavy cream just until simmering, then pour over the chocolate and let it sit for 2 minutes.

Step 9: Stir with a rubber spatula until the chocolate is completely melted and the mixture is smooth and shiny. Let the ganache cool to room temperature, stirring occasionally to maintain its smooth texture as it cools.
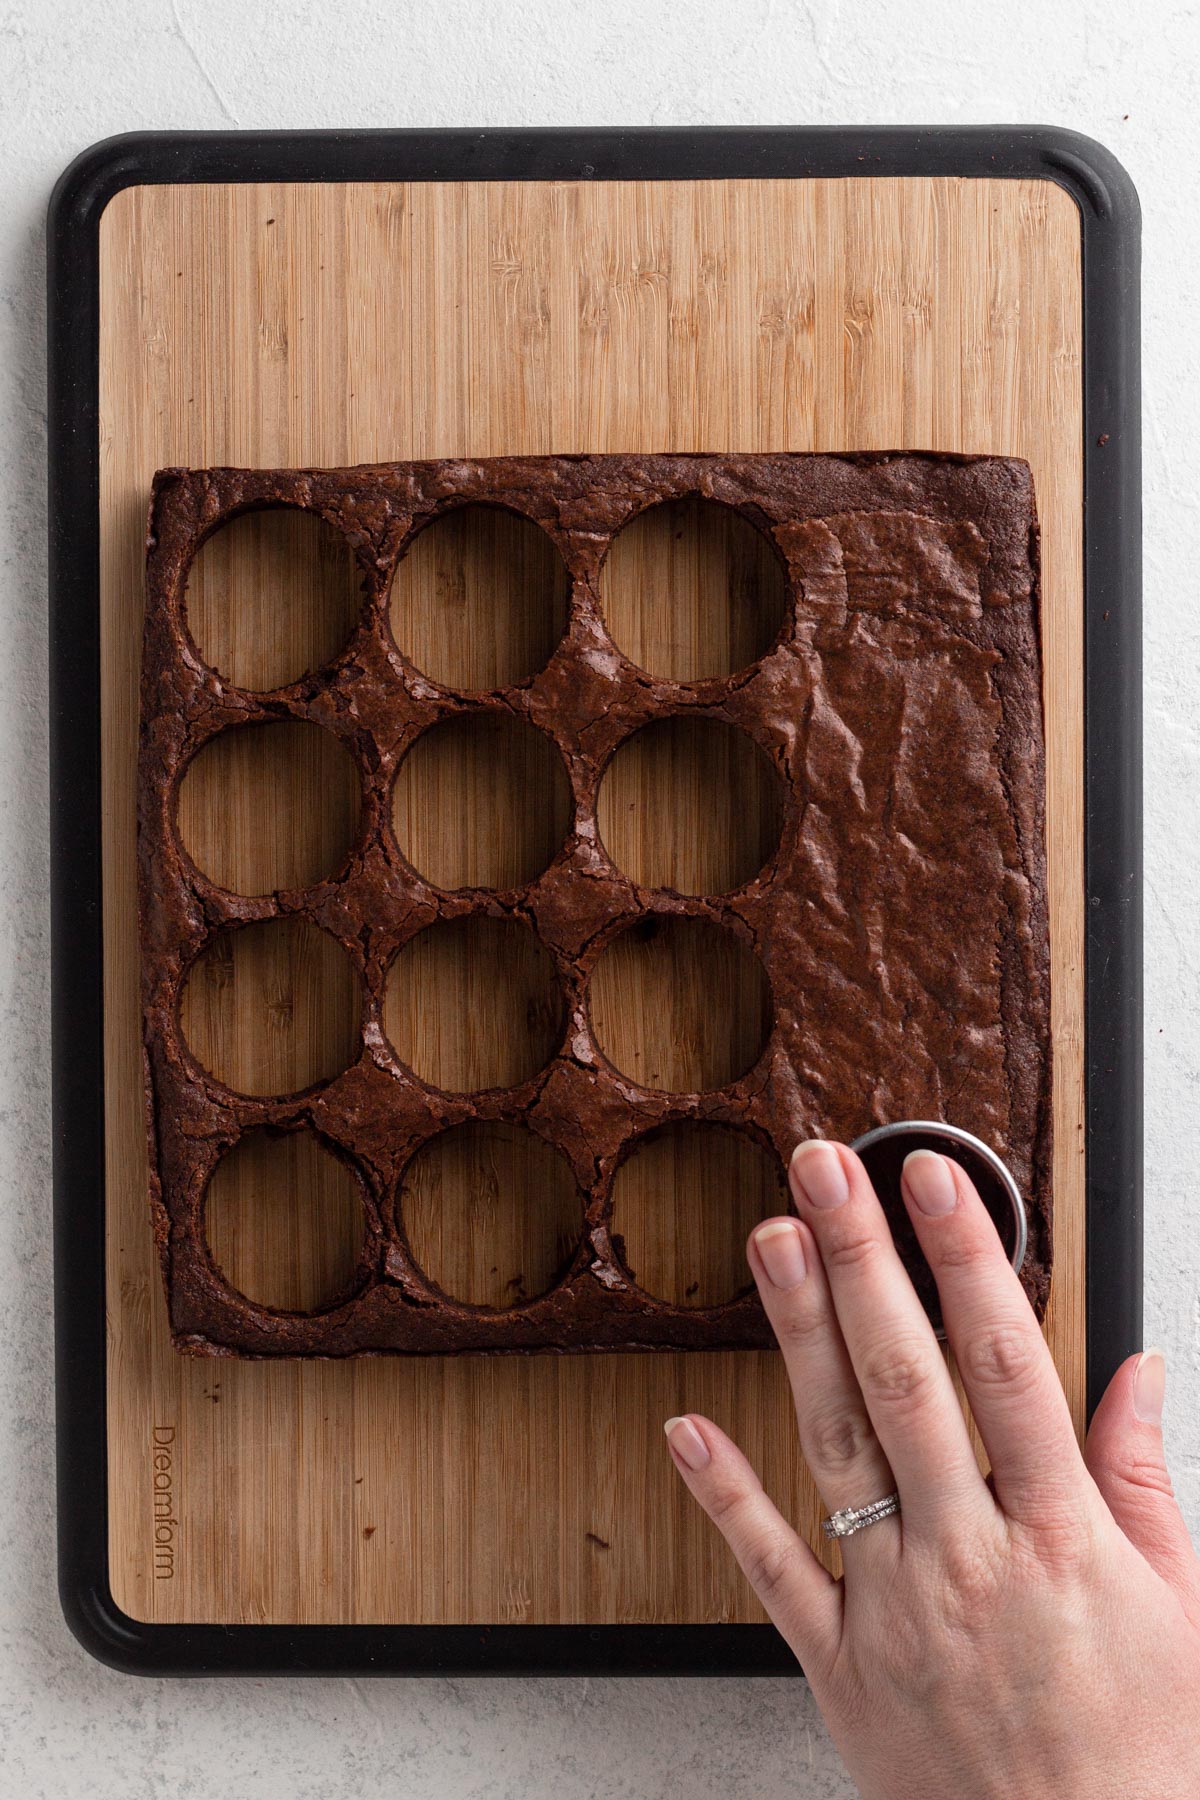
Step 10: While the ganache cools, cut the brownies. Use a 1.5-1.75 inch round cutter to cut 16 circles from the brownie.
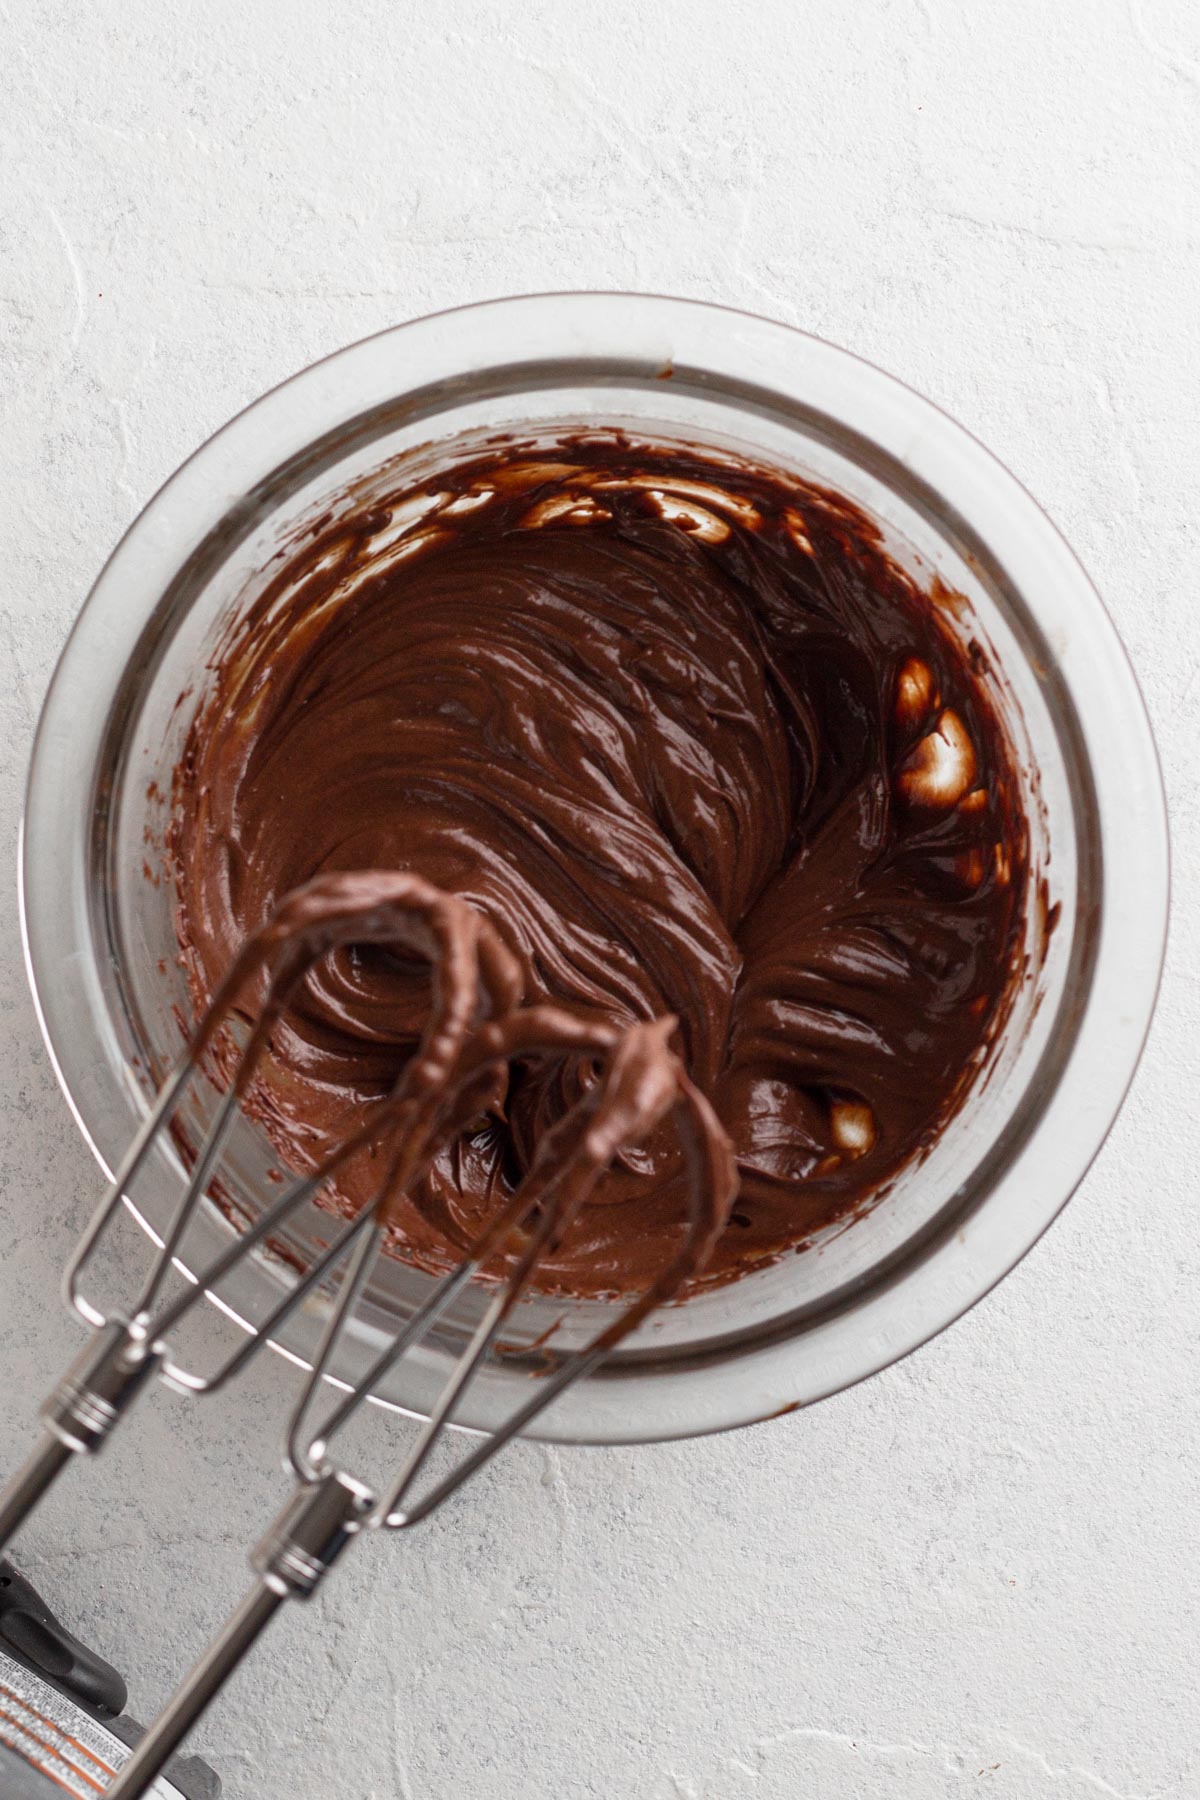
Step 11: Use an electric hand mixer to whip the cooled ganache on medium-high speed for about one minute, until it becomes light and fluffy and lighter in color.
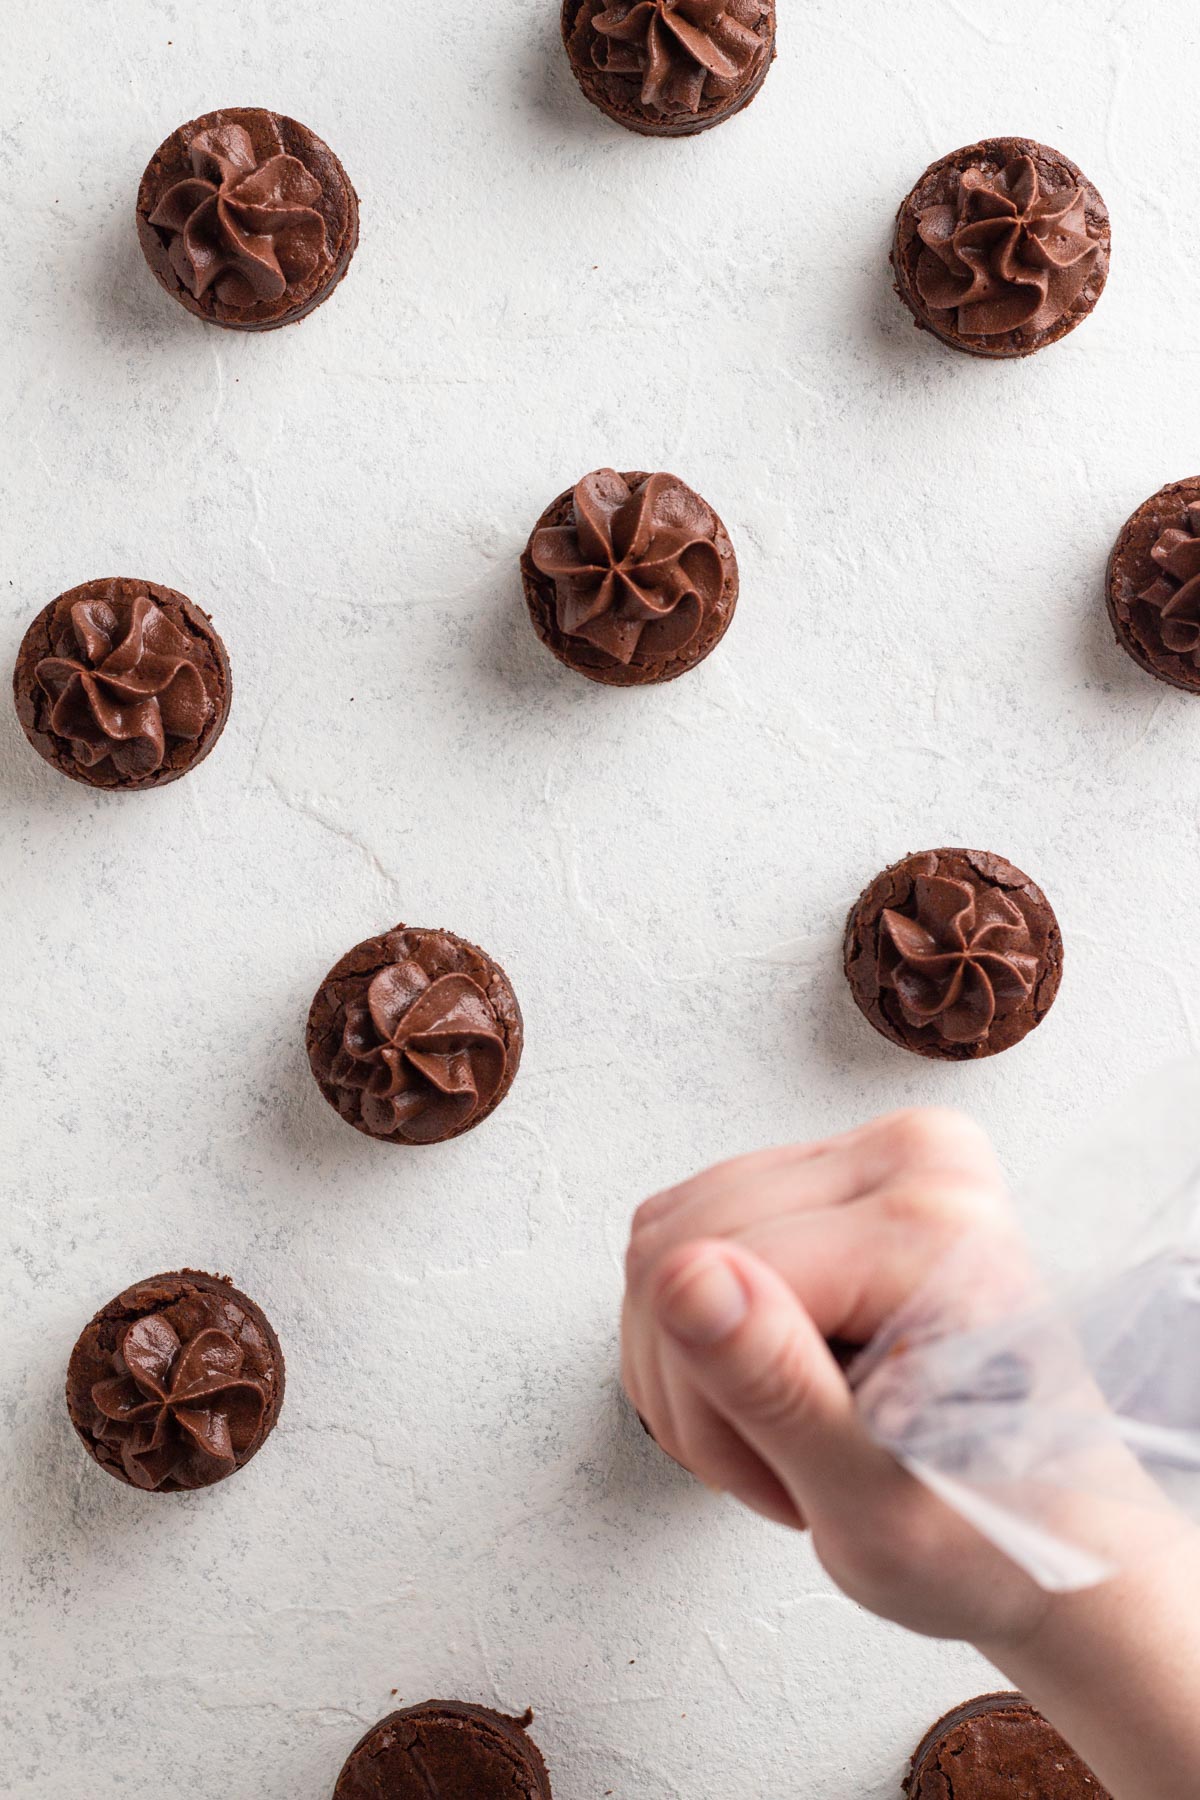
Step 12: Immediately add the whipped ganache to a piping bag fitted with the piping tip of your choice and pipe the ganache onto the brownie bites.
Allison's Top Tips
Use a serrated knife, rather than a chef knife, to chop the chocolate more easily.
Be careful not to overheat the chocolate when melting it with the butter. Heat it in short, 15 second intervals in the microwave, stirring after each, so that you can keep an eye on the chocolate as it melts to avoid burning it. And if you want to know more, check out my post of everything you need to know about melting chocolate.
Be sure to fold the dry ingredients into the wet ingredients to help avoid over mixing the batter, which could lead to overly dense brownies.
You will have leftover brownie "scraps" after cutting the brownies into bite-sized circles. Use the brownie scraps for snacking or crumble them into ice cream.
Recipe FAQs
Brownies' fudgy centers set as they cool, so it's always best to let brownies cool to room temperature before cutting. Brownies that are cut while still hot (or even warm) are prone to falling apart. Be sure to let these brownies cool completely before slicing into mini brownie bites.
Whipped chocolate ganache will set firm and hold its shape, but it will not set hard. It will hold its shape if piped but will retain a smooth and creamy texture. If chilled in the refrigerator, the whipped ganache will become even more firm.
Storage Instructions
Refrigerator: Brownie bites are best served the same day they're made. However, leftovers can be sealed in an airtight container and stored in the fridge for up to 3 days. For the best texture and flavor, let the chilled brownies sit at room temperature for 15 to 30 minutes before serving.
Freezing: It you wish to make the brownies ahead of time and freeze them, it's best to freeze the solid brownie before it's cut and topped with ganache. Wrap the cooled brownies well with plastic wrap and a layer of aluminum foil before sealing in an airtight container. Freeze for up to 2 months. Before serving the brownies, thaw them at room temperature, cut them, and top them with ganache.
For more information, check out this post all about how to store brownies.
More Brownie Recipes
Love this recipe? Please leave a star rating and review on the recipe below! And don't forget to subscribe to Always Eat Dessert for even more easy dessert recipes and helpful baking tips.
Recipe

Brownie Bites with Whipped Chocolate Ganache
Special Equipment
- 1 ½ inch round cookie cutter
Ingredients
Brownie Bites
- ½ cup (114 grams) unsalted butter
- 1 ½ ounces (43 grams) semi-sweet chocolate baking bar, chopped
- 1 cup (200 grams) granulated sugar
- ⅜ cup (83 grams) light brown sugar
- 1 ½ teaspoons (6 grams) vanilla extract
- 2 large eggs, room temperature
- ⅔ cup (83 grams) all-purpose flour
- ⅔ cup (57 grams) unsweetened natural cocoa powder
- 1 teaspoon (1 grams) espresso powder, optional
- ¾ teaspoon (4.5 grams) fine sea salt
Whipped Ganache Topping
- 3 ounces (85 grams) semisweet chocolate baking bar*, chopped
- 3 ounces (85 grams) heavy cream
Instructions
- Preheat the oven to 350°F. Line an 8"x8" metal baking pan with parchment paper and set aside.
Make the brownies.
- In a large, microwave-safe bowl, melt butter and chocolate in the microwave in 15 second increments. Whisk until smooth.
- Add both sugars and whisk until combined.
- Add vanilla and eggs and whisk until combined.
- Add flour, cocoa powder, espresso powder, and salt and fold into the sugar mixture. (Note: It will seem like the batter is too dry at first, but keep folding. It will come together! Once mixed, the batter will be quite thick.)
- Spread the batter into the prepared pan using a rubber spatula.
- Bake for 30-35 minutes. The tops should appear shiny and a toothpick inserted into the center should come out with a few moist crumbs but no raw batter. Let the brownies cool completely in the pan before removing them by lifting up on the edges of the parchment paper.
Make the chocolate ganache.
- Once the brownies are completely cool, place chopped chocolate in a heatproof bowl and set aside.
- Add the heavy cream to a small saucepan and heat just until simmering. Pour the simmering cream over the chocolate and let it sit for 2 minutes.
- Stir with a rubber spatula until the chocolate is completely melted and the mixture is smooth and shiny.
- Let the ganache cool to room temperature, stirring occasionally to maintain its smooth texture as it cools.
Cut and top the brownies.
- While the ganache cools, cut the brownies. Use a 1.5-1.75 inch round cutter to cut 16 circles from the brownie. (You will have scraps leftover for snacking!)
- Use an electric hand mixer to whip the cooled ganache on medium-high speed for about one minute, until it becomes light and fluffy and lighter in color.
- Immediately add the whipped ganache to a piping bag (or plastic bag with the corner snipped off) fitted with the piping tip of your choice and pipe the ganache onto the brownie bites.
Keiko says
Recipe looks delicious! Looking to make this for galentines this year! Could I skip whipping the ganache and just spread it as is?
Allison Ferraro says
Hi Keiko! Yes, you can absolutely use the ganache without whipping it. I'd recommend letting it cool slightly (about 5-10 minutes) so that it's still pourable but not too runny and pouring it over the brownie bites for a smooth and glossy topping (pouring slowly and carefully so it doesn't all run down the sides of the brownies). Or you can let it cool a bit more and spread it on.
- Allison
Paula Richard says
These are so good! DO NOT skip ahead and use a box mix. I made the recipe exactly as written and they were the best brownies I ever had. The whipped ganache was the perfect topping.
Allison Ferraro says
I'm so glad you loved this recipe, Paul! Thank you so much for taking the time to leave a review.
- Allison
Donna says
Made this recipe, hmmm noticed that there was not any type of leavening agent I.e. baking soda or powder, also there seems like there is a very large amount of sugar and the batter came out grainy. The recipe calls for 3/8 cup brown sugar- I don’t know about anyone else but I don’t have that measurement- so I thought (hope) it was 3/4 cups.
I am waiting for them to cool but the brownies just don’t look quite right- hopefully you can offer some corrective actions, hopefully they do not taste as grainy as they still look- and yes, I did mix the sugars in correctly
Allison Ferraro says
Hi Donna! You're correct that there's no leavener in these brownies. It's common for fudgy brownie recipes to skip any leavener, since we're aiming for a moist and dense brownie and therefore don't want the batter to rise as it bakes. For the sugar, it is just 3/8 cup. 1/8 cup is equal to 2 Tablespoons, and so 3/8 cup is equal to 6 Tablespoons (or 1/4 cup plus 2 Tablespoons). I realize that many measuring cup sets don't include a 1/8 cup measure, so you could convert this to Tablespoons or measure by weight using a scale (3/8 cup packed brown sugar equals 83 grams). The extra sugar would explain the graininess, and I'm sorry the recipe didn't turn out as you'd hoped.
- Allison
Angie says
Hello,
i can't wait to make these brownies! What tip did you use?
Allison Ferraro says
Hi Angie! The photo at the top of the post and in the recipe card uses the Wilton 1M piping tip. The photo of the brownie bites that just above the FAQs in the post uses a piping tip from an old set that I have that's smaller than the Wilton 1M and with more "teeth". Hope that helps!
- Allison
Nicole says
I made these and I didn’t have anything to cut them into circles with so I baked them in a mini cupcake pan and they came out so good! I only baked them for about 15 minutes
Valerie Gordon says
I wanted to scale the recipe up to 3x, but I noticed the pan size didn't change.
Allison Ferraro says
Hi Valerie! You're correct... scaling the recipe re-calculates the ingredients but not the instructions. The recipe can be easily doubled and baked in a 9x13 (note that they may need an extra minute or two of baking time, since a double recipe will yield slightly thicker brownies in a 9x13 pan compared to a single recipe in an 8x8 pan). I'm afraid there's not a standard size pan that accommodates a triple recipe, so I would recommend dividing the batter among a 9x13 pan and an 8x8 pan (with 2/3 of the batter going in the 9x13 pan and 1/3 in the 8x8 pan).
- Allison
Chelsea says
How many days in advance can you make this recipe?
Allison Ferraro says
Brownies are best served the day they're made, but if you must make them in advance I'd advise making the brownies just one day ahead and adding the topping the day you plan to serve. You could also bake them, wrap them tightly with plastic once completely cooled, and freeze for up to a month before defrosting and serving. If freezing, freeze without the ganache topping and add it the day you plan to serve. The brownies will keep for several days, but their texture will be optimal the day they're made.
- Allison
Joann says
Can you tell me how tall these brownies were?
Allison Ferraro says
Hi Joann! I'm afraid I can't say with certainty since I haven't measured them, but I would guess they are between 1/2 and 3/4 inch thick. Their thickness is in line with other fudgy brownie recipes I've tried. If you prefer a taller/thicker brownie, definitely check out my recipe for chewy fudgy homemade brownies!
- Allison
Debbie says
Do you think mini muffin tins could be used in this recipe rather than the baking pan? Thanks.
Allison says
Hi Debbie! I have not tested this recipe using a mini muffin pan; however, I do think it would work! Just be sure to keep an eye on the brownies as they bake (by peeking through the door with the oven light on, rather than opening the oven door) to be sure that they don't over bake. Slicing the baked brownies as shown in the recipe ensures soft edges, and there's a risk of crispy brownie edges if they're baked in a muffin pan, which is why I suggest keeping a close eye on them. If you do give this method a try I'd love to hear how it turns out.
Happy Baking!
-Allison
Sarah says
Hello, how many grams of chocolate do I have to use for brownies?
Allison says
Hi Sarah! The brownies call for 2 types of chocolate: semi-sweet baking chocolate and unsweetened natural cocoa powder. For the semi-sweet chocolate, the brownies call for 1.5 ounces, which translates to about 42.5 grams. I did not weigh my ingredients for this recipe, so I cannot give you a 100% accurate conversion for the cocoa powder. However, I did a quick search online and, according to Joy of Baking, there are 85 grams in 1 cup of unsweetened natural cocoa powder. Since this recipe calls for 2/3 cup cocoa powder, that would translate to about 54.5 grams. Again, I did not weigh my ingredients and so I can’t confirm this cup-to-grams conversion, but that would be my best guess.
I hope this helps, and happy baking!
xx Allison
Brenda Barrett says
I made these for my book club Christmas party and they were a big hit. I cut them in tiny squares so I got 30 instead of 16 but, they’re not quite as pretty. This will be my new go-to brownie recipe. Even without the ganache they’re the best brownies I’ve ever eaten.
Allison says
I'm so glad you loved this recipe and that they were a big hit at your party! Thanks for leaving a review 🙂
xx Allison