
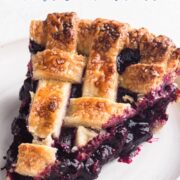
With an easy blueberry pie filling that's guaranteed to set (no runny pie filling here), hints of cinnamon and citrus, and a buttery, flaky pie crust, this blueberry pie recipe is the BEST! And since this recipe is made using frozen blueberries, we can enjoy a perfect homemade blueberry pie any time of year!

"Delicious pie and so easy! I made two pies and everyone loved it. Can't wait to make again." - Debbie, ⭐️⭐️⭐️⭐️⭐️
My favorite thing about blueberry pie is just how simple it is. Sweet and tart blueberries paired with buttery, flaky pie crust makes for a seriously delicious combination. This classic blueberry pie recipe combines my favorite homemade pie crust with an easy-to-make homemade blueberry pie filling to create what is hands-down the most delicious blueberry pie I've ever eaten!
Blueberry Pie Filling Recipe
If you've ever made a blueberry pie and ended up with a runny or soupy filling when you sliced into it, I bet you didn't pre-cook the filling (or at least didn't cook it long enough) before baking the pie. No shame, I've done it too! But pre-cooking the filling is your secret insurance policy to making sure that the filling sets perfectly when the pie bakes.
By pre-cooking the filling on the stovetop before it bakes in the pie, you'll cook off some of the liquid from the berries ahead of time. This way the berries won't release too much liquid when the pie bakes and you'll have a set filling and clean slices when it's time to serve the pie. And let me tell you... your friends and family will be impressed!
This simple blueberry pie filling recipe is packed with blueberry flavor, amplified by hints of citrus and cinnamon, sweetened with a mix of white and brown sugars, and thickened with cornstarch. It comes together in minutes in just one pot. And it tastes delicious!

Fresh Vs. Frozen Berries
I've baked lots of blueberry pies using both fresh and frozen berries, and there are a few reasons why I prefer using frozen berries:
- Frozen blueberries are available all year round, so our blueberry pie cravings won't be limited to the early summer.
- Frozen blueberries are also generally more affordable than fresh berries, which is great since we'll need a lot of them to bake a pie.
- Frozen berries were typically picked and flash-frozen at their peak ripeness, so their flavor and nutrients are in-tact.
The one potential downside of using frozen berries is that they'll release more liquid than their fresh counterparts. However, this is no problem, since we're pre-cooking the pie filling to ensure it thickens properly.
And before you ask, yes, you can absolutely bake this pie with fresh berries instead if that's your preference.Both the filling and pie may cook a little more quickly, so keep an eye out for cues that they're done (visual cues are included in the recipe).
Why You'll Love This Recipe
This recipe is simple to make, but it still required loads of testing to get it just right. I tested different sugar quantities, different citrus and spice notes in the filling, different baking temperatures and times, and more to make sure that this recipe is perfect. Because if you're going to make a homemade pie from scratch, you want it to be perfect. Here's why this recipe will be your new favorite!
- Simple & Easy to Follow - Homemade pie can be intimidating (I know because I've been there), so I created this recipe to be foolproof and included detailed instructions and loads of tips and tricks to help you bake a perfect blueberry pie. Even if you've never baked a homemade pie before, you got this!
- Flavorful Filling - A bit of citrus is a staple in blueberry pie (it enhances the flavor of the berries), but I wanted to include a bit of cinnamon so decided to use both! I love the taste of cinnamon with blueberries (like in these blueberry streusel muffins) since the spice flavor complements the sweetness of the berries so well. Most blueberry pies use lemon juice (and sometimes zest, too) to enhance the berries' flavor, but I opted to use orange juice instead since it also pairs really well with cinnamon. Plus, if you're using my perfect pie crust recipe you'll already have some leftover orange juice on hand! Of course, if you prefer, you can use lemon juice instead.
- Make Ahead - Much of this recipe can me prepared ahead of time. Homemade pie crust dough can be made and refrigerated up to 3 days in advance (or up to 3 months in advance and frozen). The blueberry pie filling can be made up to 2 days in advance, cooled to room temperature and then stored in an airtight container in the fridge until ready to use. And the pie itself can (and should) be baked a day before you plan to serve it so that it has time to fully cool and set.
Ingredient Notes & Substitutions
See recipe card at the bottom of this post for full ingredient list and measurements.

Pie Crust - Use your favorite pie crust to make this pie. Here's mine.
Frozen Blueberries - Like I mentioned above, frozen blueberries are a more affordable option that's available year round. Wyman's Frozen Wild Blueberries from Maine are my personal fave for the best flavor. Feel free to use fresh berries instead if you have them.
Cornstarch - Cornstarch is used to help thicken the pie filling to ensure it sets when baked, allowing for clean slices.
If you're curious to explore other options for thickening pie filling, King Arthur Baking has a wonderful guide on pie thickeners, including how much thickener to use for different types of fruit pies.
Sugar & Brown Sugar - A mix of both white and brown sugars create a more complex sweetness in the pie filling.
Cinnamon - A dash of cinnamon in the filling complements the sweet blueberries for a more delicious filling.
Orange Juice - A little bit of orange juice in the filling helps to enhance the blueberry flavor.
Egg - And egg wash (mixture of egg and water whisked together) brushed on top of the pie before it bakes creates a beautifully shiny crust.
Turbinado Sugar - Turbinado sugar, with its large crystals, light brown color and sweet caramel-molasses flavor, adds a sugary crunch to the top of the pie. Feel free to skip the sugar if you prefer.
Special Equipment
In addition to essential baking equipment (like a whisk and cooling rack), I recommend some special tools for making this recipe.
- Pan for cooking blueberries (a 3-5 quart saucepan, sauté pan, or Dutch oven will work well).
- Rolling pin, for rolling out the pie crust.
- 9-inch glass pie plate, for baking the pie. (See recipe note for using a 9.5 inch or deep dish pie plate.)
- Rimmed baking sheet, for catching any drippings from the pie as it bakes.
- Pastry brush, for brushing egg wash onto the pie crust before baking.
- Pie crust shield, for keeping the edges of the pie crust from over browning when baking (optional, or DIY a pie crust shield with a bit of aluminum foil).
Step-By-Step Recipe Instructions
See recipe card at the bottom of this post for detailed recipe instructions.
Before you begin, prepare the pie crust dough. The dough should be separated into two discs (one for the top crust and one for the bottom crust) and will need to be refrigerated for at least 2 hours before using.

Step 1: In a large pot, cook blueberries, both sugars, cornstarch, orange juice, cinnamon, and salt until thick and bubbling. Transfer the filling to a bowl and let it cool to room temperature.
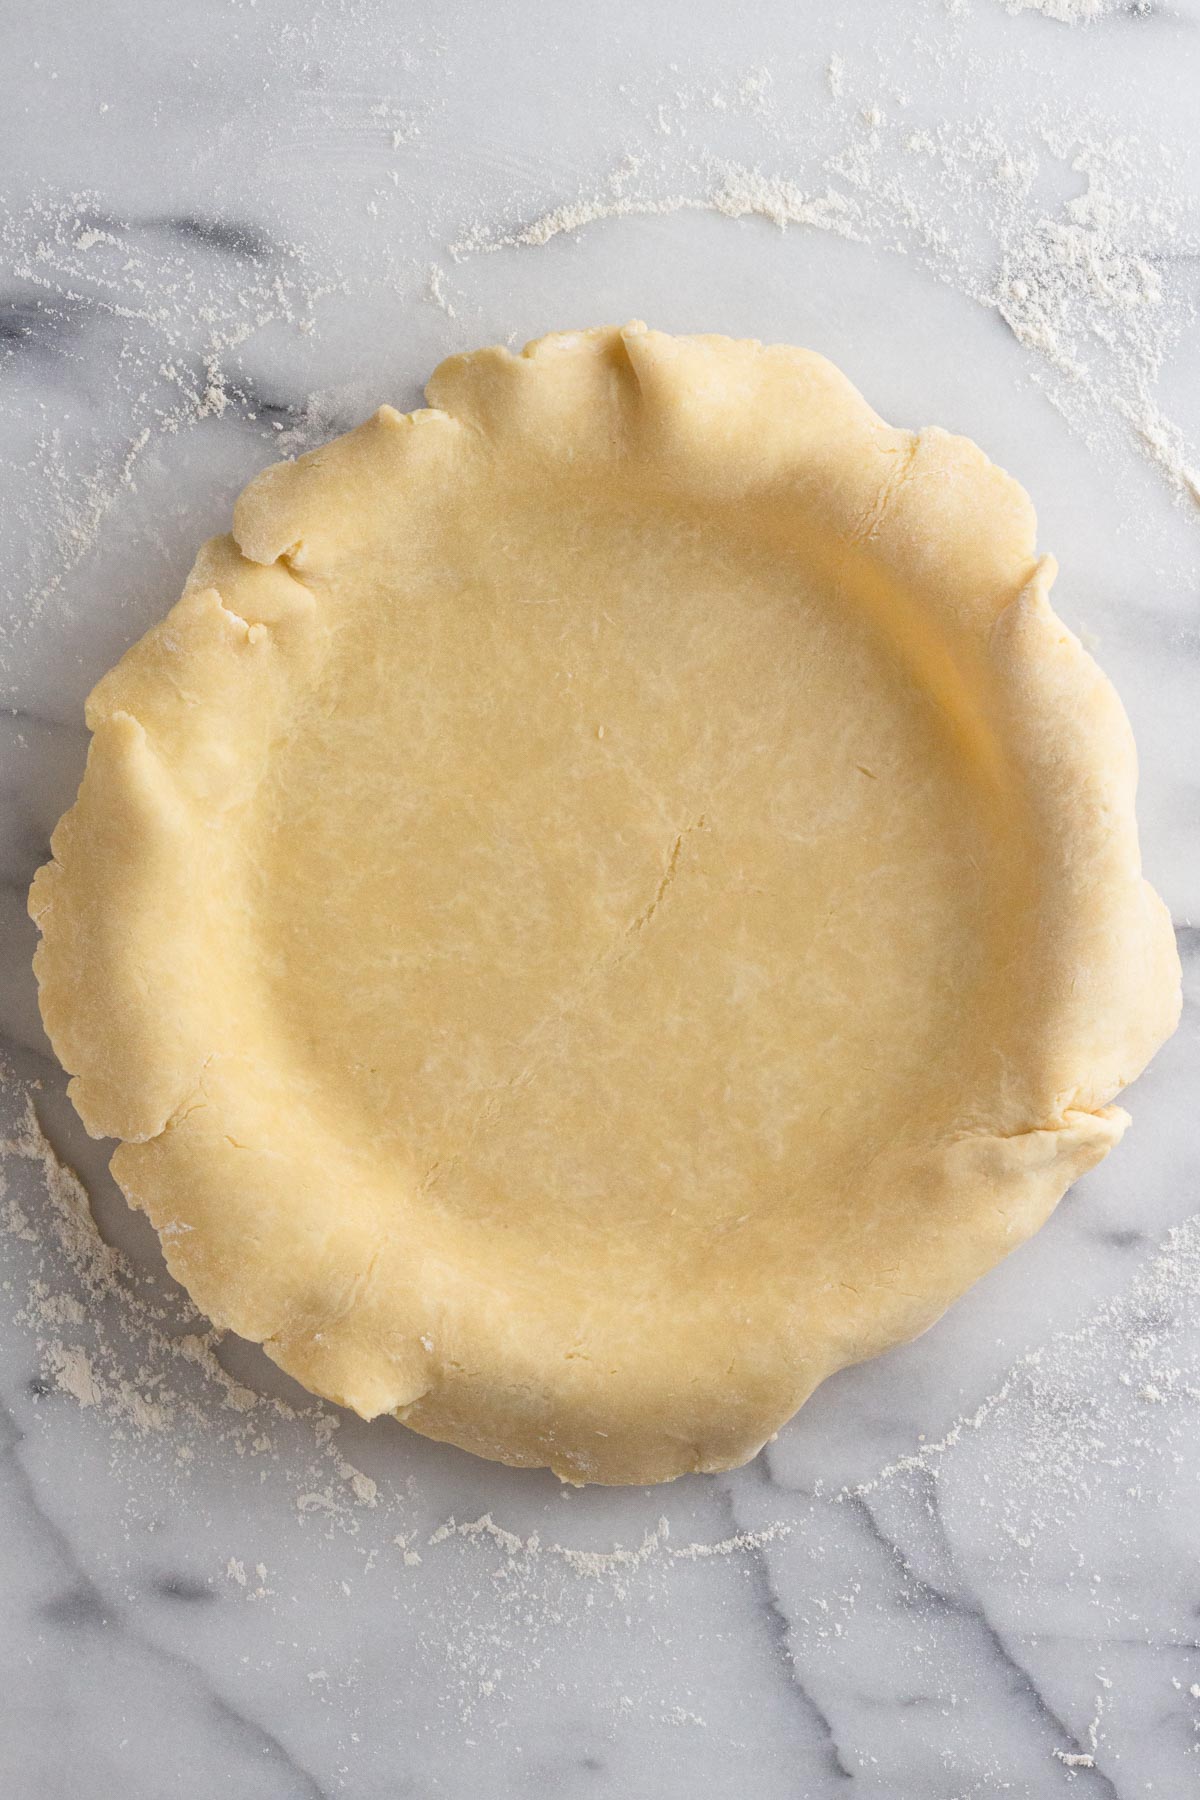
Step 2: Roll one disc of pie crust dough into a circle that's 12 inches in diameter. Carefully transfer the rolled out crust to your pie plate.

Step 3: Pour the room temperature pie filling into the crust.

Step 4: Roll out the other disc of dough into a circle that's 12 inches in diameter. Place the rolled out dough over the filling in the pie plate (or create a lattice pie top). Trim any excess, then seal or crimp the edge.

Step 5: Prepare an egg wash by whisking together an egg with 1 Tablespoon of water. Brush the egg wash over the crust, then sprinkle turbinado sugar over the egg wash.

Step 6: Bake the pie at 425°F for 20 minutes then turn the oven temperature down to 350°F and continue baking for 45-50 minutes, until the crust is golden and the filling is bubbling. Let the pie cool completely before slicing and serving.
Allison's Top Tips
While rolling out the dough, be sure to alternate directions and roll your rolling pin beyond the edges of the dough to ensure an even thickness throughout. The circle should be a few inches larger than the diameter of your pie place.
A lattice pie top isn't just pretty, it allows steam to escape from the pie through the gaps in the crust as it bakes. I'll show you how to create a lattice pie crust in this post. If you prefer to stick to a solid pie crust, be sure to slice a few vents into the top of the pie before baking.
It's helpful to put a rimmed baking sheet under the pie in the oven to catch any drips from the pie as it bakes.
A scoop of vanilla ice cream is absolutely delicious with a slice of blueberry pie, and it will also help to hide any imperfections in the crust that you may want to cover up.

Recipe FAQs
There are four components to creating a blueberry pie that is not runny. First, you need to include a thickener in the filling, such as cornstarch, flour, or tapioca. Second, you need to pre-cook the filling before adding it to the pie crust and baking the pie in order to cook off some of the extra liquid from the berries. Third, be sure to bake the pie long enough, because an under-baked pie is less likely to set. And fourth, let the pie cool completely before slicing and serving to ensure that the filling is fully set.
The pie is finished baking when the crust is golden brown and the filling is bubbling through the vents (or lattice) in the top crust. If the crust is browning but the filling is not yet bubbling use a pie crust shield or a piece of aluminum foil to keep the pie from over-browning while it continues to bake.
Bake the pie in the bottom third of the oven to ensure that the bottom crust browns and the top crust doesn't over-brown. I like to bake my pie with the shelf on the second from bottom rung, with a baking sheet on the bottom shelf to catch any drips.
Storage Instructions
Store pie in a sealed container at room temperature or in the fridge for up to 3 days. The pie will taste best at room temperature, so allow the pie to sit at room temperature before serving if storing it in the fridge.


Love this recipe? Please leave a star rating and review on the recipe below! And don't forget to subscribe to Always Eat Dessert for even more easy dessert recipes and helpful baking tips.
Recipe

Blueberry Pie with Frozen Blueberries
Special Equipment
- Pan for cooking blueberries (a 3-5 quart saucepan, sauté pan, or Dutch oven will work well)
- Rolling Pin
- 9-inch glass pie plate (see note for using a 9.5 inch or deep dish pie plate)
- Rimmed baking sheet
- Pastry brush
- Pie crust shield (optional)
Ingredients
- 1 double-crust pie crust refrigerated
- 6 cups (840 grams) frozen blueberries (or fresh berries, see recipe note)
- ½ cup (99 grams) granulated sugar
- ¼ cup (53 grams) light brown sugar
- ¼ cup (28 grams) cornstarch
- 2 Tablespoons (28 grams) orange juice (or lemon juice)
- ½ teaspoon (2 grams) ground cinnamon
- ½ teaspoon (3 grams) fine sea salt
- 1 large egg
- 1 Tablespoon (12 grams) turbinado sugar
Instructions
Prepare the pie crust dough.
- The dough should be separated into two discs (one for the top crust and one for the bottom crust) and will need to be refrigerated for at least 2 hours before using. If making homemade pie crust, you can make the dough up to 3 days ahead and keep it refrigerated (wrapped tightly with plastic wrap) until you're ready to bake your pie (or make it up to 3 months in advance and freeze it).1 double-crust pie crust
Make the blueberry pie filling.
- In a large pot, combine blueberries, both sugars, cornstarch, orange juice, cinnamon, and salt. Stir gently to coat the blueberries.6 cups (840 grams) frozen blueberries, ½ cup (99 grams) granulated sugar, ¼ cup (53 grams) light brown sugar, ¼ cup (28 grams) cornstarch, 2 Tablespoons (28 grams) orange juice, ½ teaspoon (2 grams) ground cinnamon, ½ teaspoon (3 grams) fine sea salt
- Cook the filling on the stove on medium-low heat until the berries release their juices, about 10 minutes. Stir the mixture frequently while cooking.
- Turn the heat up to medium and continue to cook, stirring frequently, until the filling thickens and begins to bubble, about 10 more minutes. Let the filling cook while bubbling for 1 minute.
- Transfer the filling to a heat-safe bowl and let it cool to room temperature.
Assemble the pie.
- Ten to fifteen minutes before you plan to begin assembling the pie, remove the pie crust dough from the fridge and place on a cooling rack to soften slightly. (The dough should still be cool and slightly firm, but not so cold and firm that it cracks significantly when rolled. If the dough feels soft or mushy when held or pressed with your thumb, it has become too warm and will need to be re-chilled before it can be rolled out.)
- Lightly sprinkle flour onto a clean counter or surface for rolling out the dough and onto your rolling pin. Place one unwrapped disc of dough onto the floured surface and roll the dough into a circle that's 12 inches in diameter. Carefully transfer the rolled out crust to your pie plate.
- Pour the room temperature pie filling into the pie crust in the pie plate.
- Lightly sprinkle more flour onto the counter and rolling pin, then roll out the other disc of dough into a circle that's 12 inches in diameter.
- Place the rolled out dough over the filling in the pie plate (or create a lattice pie top). Trim any excess pie crust from the edges, then seal or crimp the edge. If using a solid crust top, use a small knife to cut a few small vent holes into the top crust for steam to escape while the pie bakes. Place the pie into the fridge to chill briefly while the oven preheats (see recipe note below regarding safety).
- Place your oven rack in the bottom third of the oven and place a baking sheet onto this or a lower oven rack. (This will catch any filling that bubbles out of the pie plate so that it doesn't drip into the oven). Preheat the oven to 425°F.
- Once the oven is preheated, prepare an egg wash by whisking together an egg with 1 Tablespoon of water until well blended. Remove the pie from the fridge and use a pastry brush to brush the egg wash over the crust. Sprinkle turbinado sugar over the egg wash.1 large egg, 1 Tablespoon (12 grams) turbinado sugar
Bake the pie.
- Bake the pie at 425°F for 20 minutes. Then turn the oven temperature down to 350°F and continue baking for 45-50 minutes until the crust is golden and the filling is bubbling. (NOTE: A pie crust shield will come in handy to ensure the edges of the crust don't burn. After 20 minutes, when you turn down the temperature, quickly but carefully open the oven and reach in to place a silicone pie crust shield or a bit of aluminum foil around the edges of the pie to keep the crust from burning while the pie filling continues to bake.)
- Allow the pie to cool completely (ideally overnight) on a wire rack before serving to ensure that the filling has time to set. Serve the pie at room temperature, or reheat the pie briefly in a pre-heated 325°F oven if you'd prefer to serve it warm.


Debbie says
I have tried many recipes for Blueberry pie.This was the best Blueberry pie I have ever made. Thank you for this wonderful recipe.I made this for our Thanksgiving Celebration.
Allison Ferraro says
Hi Debbie! I love that you included blueberry pie in your Thanksgiving dessert line-up! And so glad to hear that this recipe was a hit!
- Allison
Mark says
A glass pie plate the crust will not fully bake. Use a metal one instead
Allison Ferraro says
Hi Mark! I like glass pie plates and recommend them for beginner pie bakers since you can see how the bottom crust is baking, which I find helpful. Yes, metal will conduct heat more efficiently than glass and is a great choice if that's what you prefer. Either way, if this pie is baked until the filling is bubbling you'll be good to go.
- Allison
Cait says
This was delicious! I struggle with pie filling being too runny (or just being impatient and cutting into it too soon... lol) but this filling was set perfectly after cooling for 4-5 hours. Simple and SO good!
Allison Ferraro says
Waiting to dig in is definitely the hardest part! So glad you had success with this filling!
- Allison
Debbie Ellis White says
Delicious pie and so easy! I made two pies and everyone loved it. Can’t wait to make again.
Allison Ferraro says
I'm so excited to hear that, Debbie! So glad it was a hit!
- Allison
Blueberry Desserts @ www.thebakingchocolatess.com says
These are one of the best blueberry pie I’ve ever had!
Thanks for the share!
Allison says
Thank you so much for your review! I'm so glad you loved this blueberry pie recipe!
- Allison
PJ says
delicious! thank you.
Allison says
You're so welcome, PJ! I'm so glad that you loved this recipe.
-Allison