
Apple cranberry crumb pie is a simple yet spectacular holiday dessert! Flavorful and easy-to-make apple cranberry filling (spiced with cinnamon and ginger!) sits between tender, flaky pie crust and a sweet cinnamon crumb topping. It's a step-up from classic apple pie, and it deserves a spot on your menu this holiday season!

If you're looking to branch out from your classic apple and pumpkin pies this Thanksgiving but don't want to stray too far from these traditional favorites... apple cranberry crumb pie is the answer!
This recipe has become my favorite pie for Thanksgiving! Sure it's easy to make. But - most importantly - it's absolutely delicious, with a buttery crust that's filled with a spiced sweet-tart fruit filling and topped with a cinnamon oat crumb topping that's just next level.
Jump to:
Why You'll Love This Recipe
This recipe puts a delicious spin on classic apple pie and is made with a flavorful filling of apples, fresh cranberries, cinnamon, and ginger and topped with a sweet cinnamon crumb topping. My fool-proof pie crust recipe makes baking this pie from scratch a breeze!
Ingredient Notes & Substitutions
See recipe card at the bottom of this post for full ingredient list and measurements.

Pie Crust - You'll need a single crust pie crust for this recipe, giving you just enough crust for the bottom of the pie. I recommend my easy pie crust dough for this recipe (and all pie recipes!), but store-bought pie crust will also work.
Apples - For the best flavor I recommend using a mix of apples. For this pie I used 3 Honeycrisp apples (juicy and sweet) and 1 Granny Smith apple (tart).
Cranberries - You can use fresh or frozen cranberries in this recipe. If using frozen berries, do not that them before adding them to the filling.
Sugar - Sugar helps to balance the tartness of the cranberries without making the filling overly sweet.
Flour - All-purpose flour is used as a thickener in both the pie filling and the crumb topping.
Oats - Old-fashioned oats add texture to the crumb topping. Be sure to use old-fashioned rolled oats. Quick or instant oats will become mushy.
Egg - Brushing the pie crust with an egg wash - made with egg and water - will add a beautiful sheen to the crust as it bakes.
Special Equipment
In addition to essential baking equipment (like a mixing bowl and a wooden spoon), I recommend some special tools for making this recipe.
- A 9 inch glass pie plate, for baking the pie. If you're using a 9.5 inch pie plate, increase the crust and filling by 50 percent.
- A pie crust shield or aluminum foil, for tenting the pie so that the crust doesn't brown too much.
- Pastry brush, for brushing the egg wash over the pie crust edges.
Step-By-Step Recipe Instructions
See recipe card at the bottom of this post for detailed recipe instructions.

Step 1: Core and peel the apples, and slice each apple into 16 wedges. In a large bowl, stir together apple wedges, cranberries, sugar, flour, cinnamon, salt, ginger, and lemon juice. Set aside.
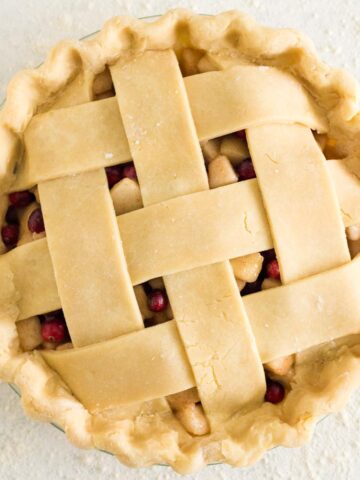
Step 2: On a lightly floured surface, roll out the pie crust dough into a circle that's ⅛ inch thick. The circle of dough should be a few inches larger than the diameter of your pie plate. Transfer the crust to the pie plate.

Step 3: Trim any excess pie crust, leaving a 1 inch overhang around the edges of the pie plate. Fold the edge of the crust underneath itself around the edge of the plate. Seal the edges of the crust by either pressing down all around the edges using the tines of a fork or by crimping the edges.

Step 4: Arrange a layer of prepared apple slices around the crust until the bottom of the plate is covered, and then pile the rest of the apple cranberry filling on top.
Step 5: In a medium bowl, combine flour, oats, brown sugar, cinnamon, and salt and stir to mix. Pour the melted butter over the mixture and stir until a crumbly dough forms.

Step 6: Sprinkle the crumb topping over the pie filling.
Step 7: Make an egg wash by whisking together one egg and one Tablespoon of cold water. Use a pastry brush to brush a thin coating of the egg wash over the edges of the pie crust.

Step 8: Bake the pie for 10 minutes at 425°F, then turn the oven down to 375°F and continue baking until the edges of the crust are golden brown and the filling is bubbling, about 40 to 50 minutes.
Allison's Top Tips
Don't add the liquid with the pie filling. When adding the fruit filling to the pie crust, do not add the extra juice in the bottom of the bowl to the pie or the filling will be too wet and the bottom crust will become soggy.
Use a pie crust shield. A pie crust shield will come in handy to ensure the edges of the crust don't burn. About 20 minutes after the pie goes into the oven, quickly but carefully open the oven and reach in to place a silicone pie crust shield or a bit of aluminum foil around the edges of the pie to keep the crust from burning while the pie filling continues to bake.
Don't under-bake bake the pie. Apples and cranberries are both naturally high in pectin (the starch that gives the fruit its structure and a natural thickener commonly used to thicken jam). The pie needs to bake long enough for the fruit to release its pectin, which will allow the filling to properly thicken so that you end up with clean pie slices instead of runny filling. If the pie filling isn't bubbling, keep baking the pie.
Let the pie cool completely before you slice it. As the pie cools, the filling will firm up, so you'll have nice, clean slices when you serve it. Allow the pie to cool completely or even overnight before serving. If you want to serve the pie warm, let it cool completely and then reheat the pie briefly in a pre-heated 325°F oven.

Storage Instructions
Store leftover pie covered with foil or in an airtight container at a cool room temperature for up to 3 days or in the fridge for up to 5 days.
More Apple & Cranberry Recipes


Love this recipe? Please leave a star rating and review on the recipe below! And don't forget to subscribe to Always Eat Dessert for even more easy dessert recipes and helpful baking tips.
Recipe

Apple Cranberry Crumb Pie
Special Equipment
- Pie crust shield or aluminum foil
- Pastry brush
Ingredients
- 1 single-crust pie crust (half of this pie crust recipe), refrigerated
Apple Cranberry Pie Filling:
- 4 medium-sized apples*
- 1 cup (100 grams) fresh or frozen cranberries (do not thaw if frozen)
- ¾ cup (149 grams) granulated sugar
- ¼ cup (30 grams) all-purpose flour
- 1 teaspoon (4 grams) ground cinnamon
- ½ teaspoon (3 grams) salt
- ¼ teaspoon (1 grams) ground ginger
- 1 Tablespoon (14 grams) lemon juice
Crumb Topping:
- ½ cup (60 grams) all-purpose flour
- ½ cup (56 grams) old-fashioned oats
- ⅜ cup (80 grams) brown sugar
- 1 teaspoon (4 grams) ground cinnamon
- ¼ teaspoon (1.5 grams) salt
- 6 Tablespoons (85 grams) unsalted butter, melted
- 1 large egg
Instructions
Prepare the pie crust dough in advance.
- The dough will need to be refrigerated for at least 2 hours. You can make the dough up to 3 days ahead and keep it refrigerated (wrapped tightly with plastic wrap) until you're ready to bake your pie.
- Place your oven rack in the bottom third of the oven and preheat the oven to 425°F.
- Remove the disk of pie crust dough from the fridge and place on a cooling rack. Allow the dough to sit for 10 to 15 minutes while you prepare the apple cranberry filling so that the dough comes to a cool room temperature. (The dough should still be slightly firm, but not so cold and firm that it cracks significantly when rolled. If the dough feels soft or mushy when held or pressed with your thumb, it has become too warm and will need to be re-chilled before it can be rolled out.)
Make the pie filling.
- Core the apples, peel them using a vegetable peeler or a small, sharp knife, and slice each apple into 16 wedges.
- Place the apples in a large bowl and add cranberries, sugar, flour, cinnamon, salt, ginger, and lemon juice. Stir until the fruit is well coated. Set aside.
Roll out the pie crust.
- Lightly sprinkle flour on a pastry cloth or clean counter and onto your rolling pin to keep the dough from sticking. Place the first disk of dough onto the floured surface and roll the dough into a circle that's ⅛ inch thick. (While rolling, be sure to alternate directions and roll your rolling pin beyond the edges of the dough to ensure an even thickness throughout. The circle should be a few inches larger than the diameter of your pie plate.) Carefully lift the rolled out crust by sliding your arms underneath it and gently place the crust into a 9 inch glass pie plate.
- Trim any excess pie crust, leaving a 1 inch overhang around the edges of the pie plate. Fold the edge of the crust underneath itself around the edge of the plate. Seal the edges of the crust by either pressing down all around the edges using the tines of a fork or by crimping the edges.
Fill the crust.
- Arrange a layer of prepared apple slices around the crust until the bottom of the plate is covered, and then pile the rest of the apple cranberry filling on top. There will be juice from the fruit in the bottom of the bowl; do not add this juice to the pie or the filling will be too wet and the bottom crust will become soggy.
Make the crumb topping.
- In a medium bowl, combine flour, oats, brown sugar, cinnamon, and salt and stir to mix. Pour the melted butter over the mixture and stir until a crumbly dough forms.
- Sprinkle the crumb topping over the pie filling.
Bake the pie.
- Make an egg wash by whisking together one egg and one Tablespoon of cold water. Use a pastry brush to brush a thin coating of the egg wash over the edges of the pie crust.
- Bake the pie for 10 minutes at 425°F, then turn the oven down to 375°F and continue baking until the edges of the crust are golden brown and the filling is bubbling, about 40 to 50 minutes. (NOTE: A pie crust shield will come in handy to ensure the edges of the crust don't burn. About 20 minutes after the pie goes into the oven, quickly but carefully open the oven and reach in to place a silicone pie crust shield or a bit of aluminum foil around the edges of the pie to keep the crust from burning while the pie filling continues to bake.)
- Allow the pie to cool completely (ideally overnight) before serving to ensure that the filling has a chance to firm up. Serve the pie at room temperature (or reheat the pie briefly in a pre-heated 325°F oven if you'd prefer to serve it warm).


Brenda Barrett says
This was a very easy recipe to follow and it came out great. It was a perfect finish to our Christmas dinner. I highly recommend it.