
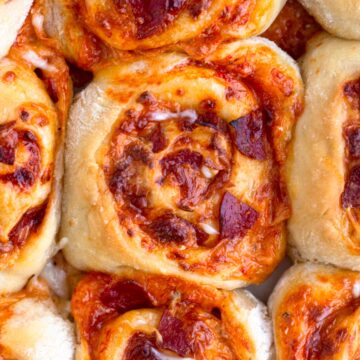
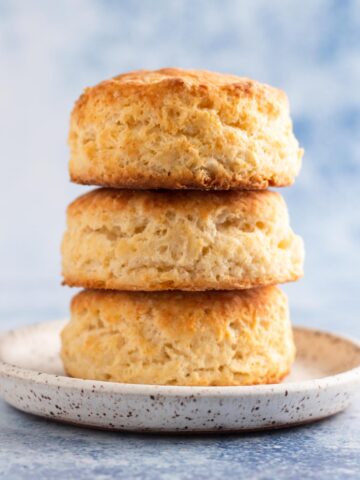
Pizza rolls get a makeover in this recipe for homemade pizza buns. These from-scratch buns are made with homemade pizza dough that's stuffed with pizza sauce, mozzarella cheese, and pepperoni. The pizza dough and toppings get rolled up, sliced into beautiful spirals, and baked in the oven. They're loved by kids of all ages, and they make the perfect party appetizer or family pizza night treat!

Jump to:
We obviously love desserts in my house, but every once in a while I like to bake something savory. And that's when my love for pizza comes front and center. But not just any pizza will do. I have a soft spot for really good homemade pizza, with a chewy, homemade crust and all. the. cheese.
If you love pizza, then you're in the right place. And if you love pizza crust just as much as you love all of the toppings, then pull up a chair right now because OH MAN - you are going to LOVE these pizza buns! Think cinnamon buns, but pizza.
Beautiful, spiral cinnamon buns are actually what inspired these adorable mini pizza spirals. They're made using the same basic method as cinnamon buns, too, except that we've swapped a sweet brioche dough for a flavorful olive oil pizza dough, and instead of a cinnamon sugar filling these pizza buns are stuffed with pizza sauce, melty mozzarella cheese, and chopped pepperoni.
Pizza buns are sure to be a hit with kids of all ages (our toddler devoured them just as quickly as my husband and I did!), so bookmark this recipe for your next family pizza night!
Ingredient Notes & Substitutions
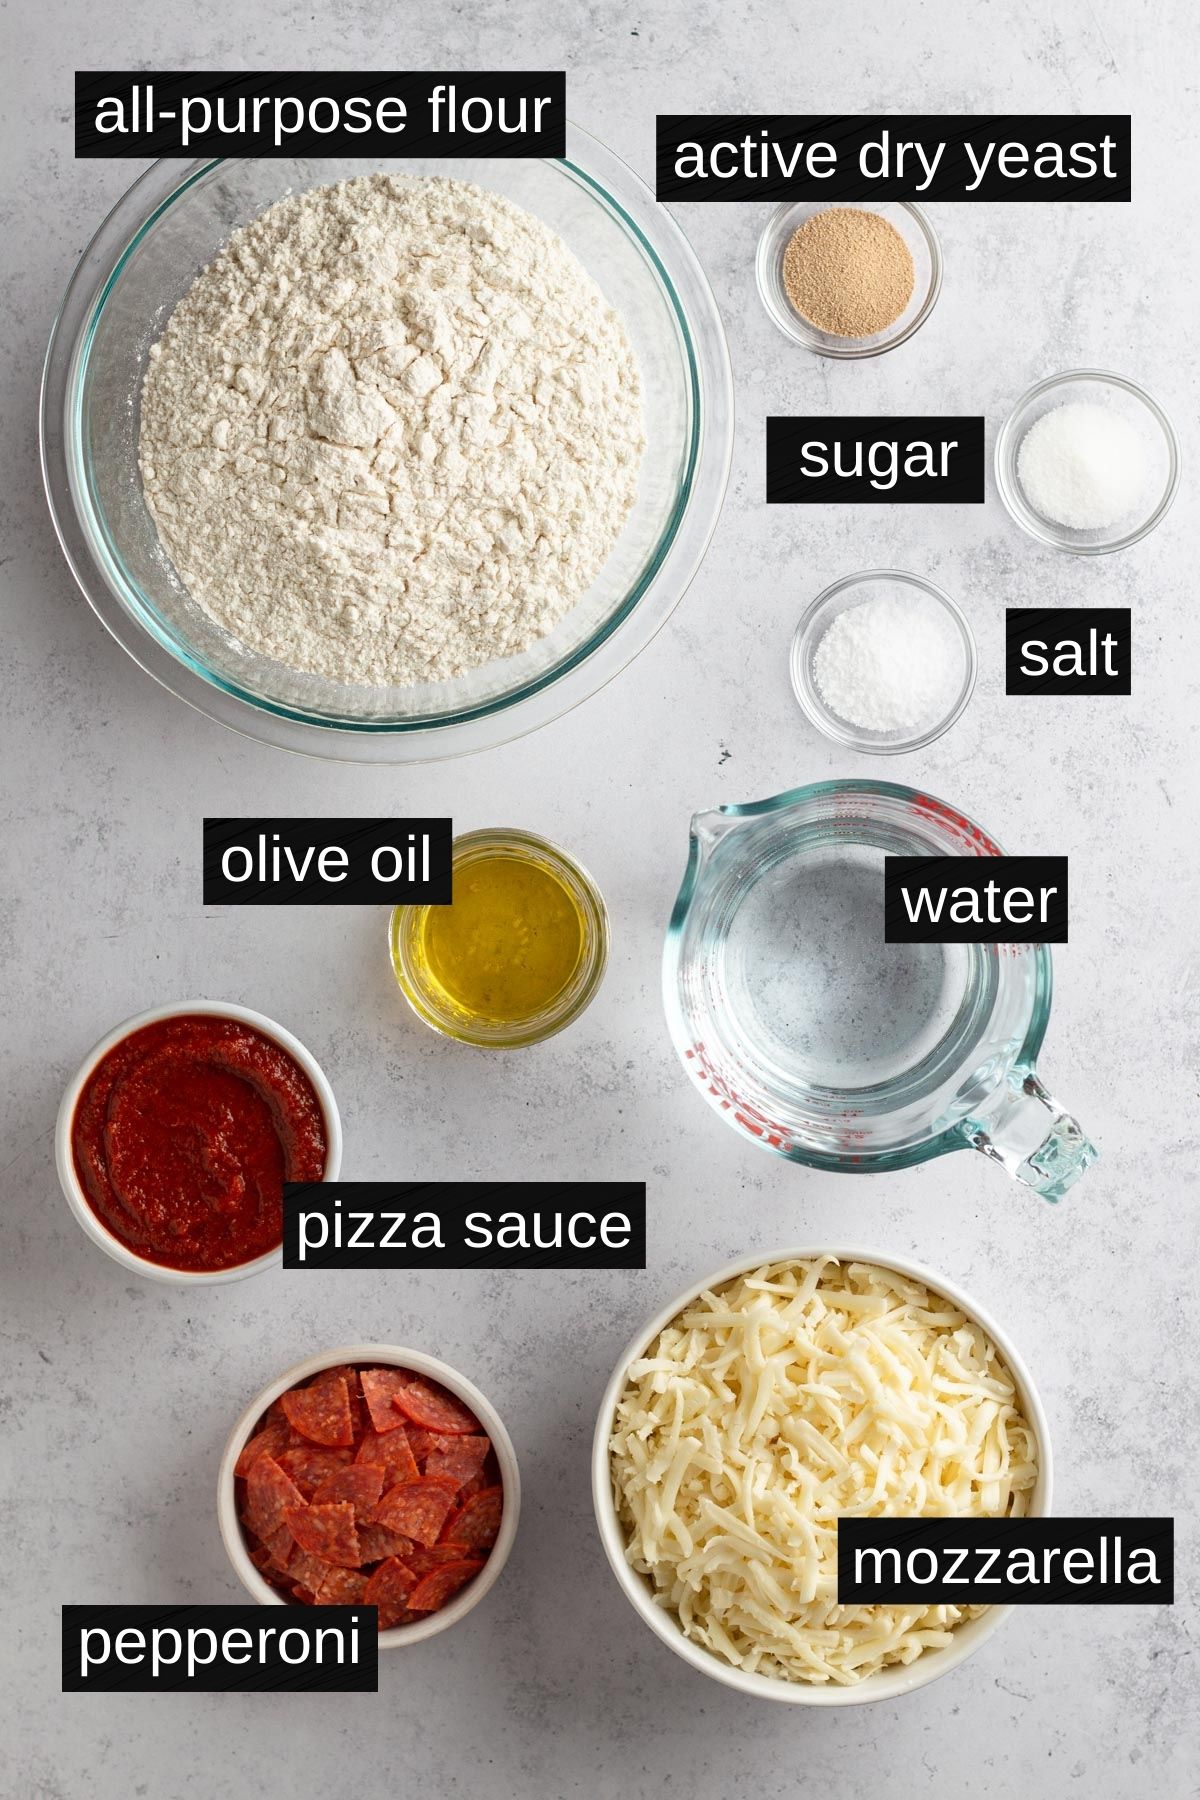
All-Purpose Flour - Flour is key to gluten formation and is therefore a key ingredient in pizza crust. For a perfectly chewy crust, go for an all-purpose flour with a higher protein content, like King Arthur Baking All-Purpose Flour.
Active Dry Yeast - Yeast is used to leaven pizza dough so that it will rise when baked. Yeast is a living organism, so be sure to use yeast that is not expired and has been properly stored in order for it to do its job.
Sugar - It may seem strange to include sugar in pizza dough, but adding just a bit of granulated sugar feeds the yeast, helping to ensure a proper rise.
Olive Oil - Olive oil is the not-so-secret ingredient to great pizza dough, since it adds flavor and also enhances the crust's texture (by helping to avoid soggy crust and encouraging browning when baked).
Mozzarella Cheese - Though you can certainly get creative with your pizza "toppings" (see below for ideas!), shredded low-moisture mozzarella cheese is a no-fail choice.
Step-By-Step Recipe Instructions
Make the Pizza Dough
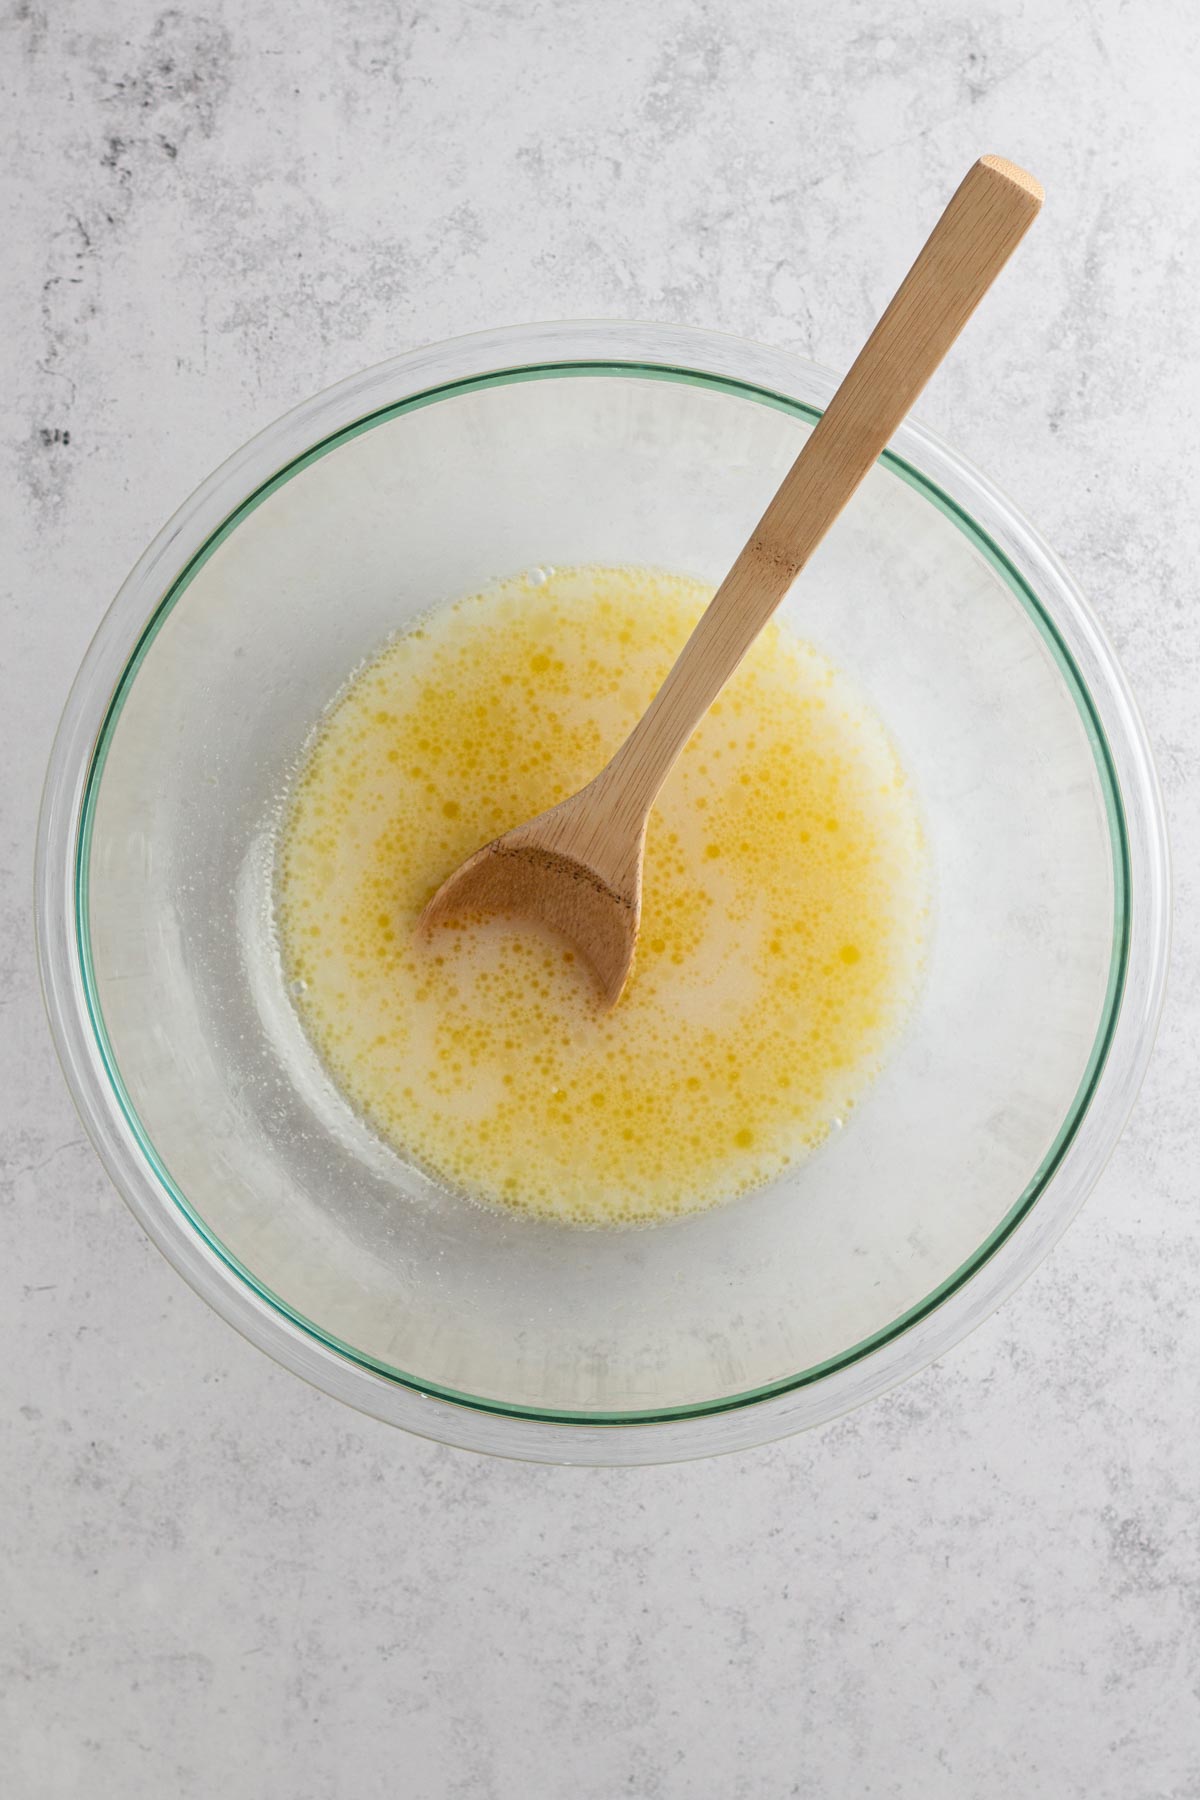
- In a large bowl, combine the water, yeast, sugar, salt, and olive oil.
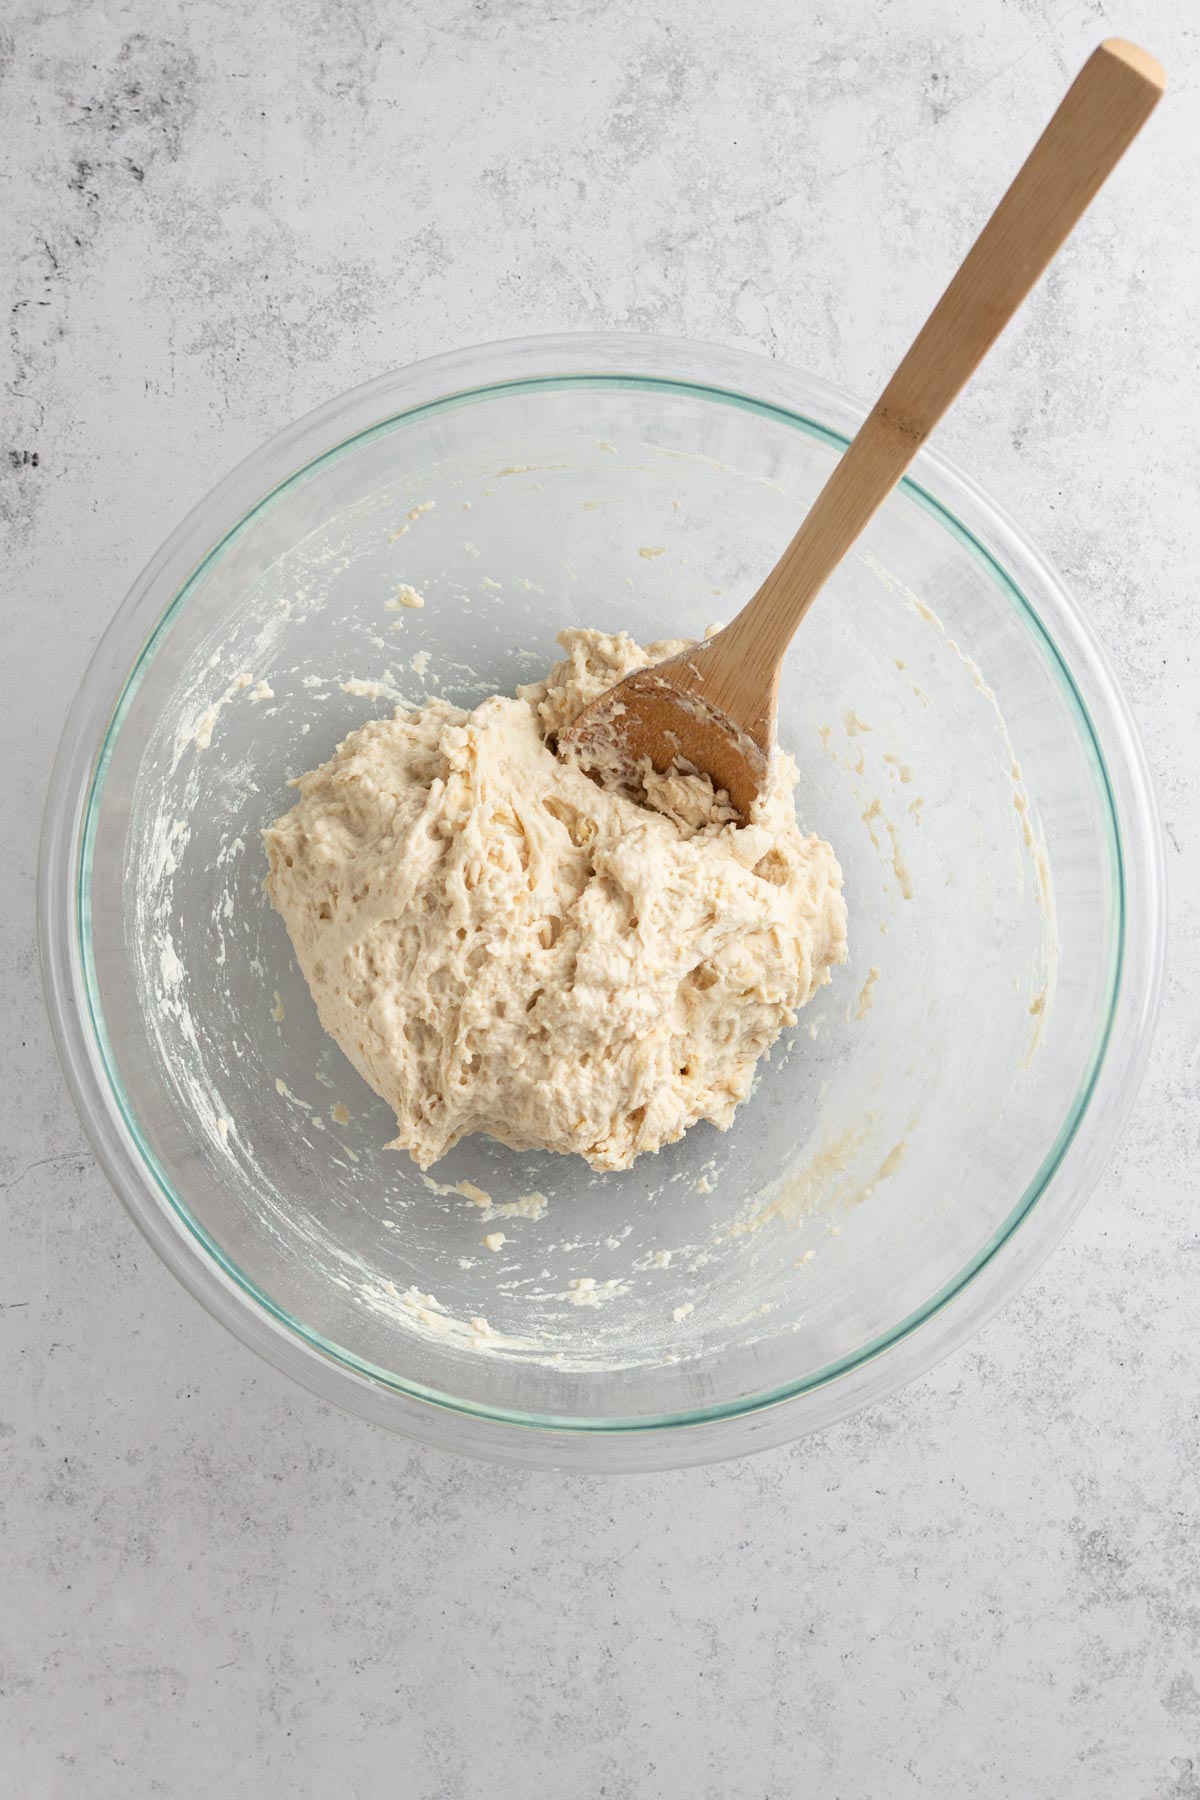
- Add the flour and gently mix using a wooden spoon.
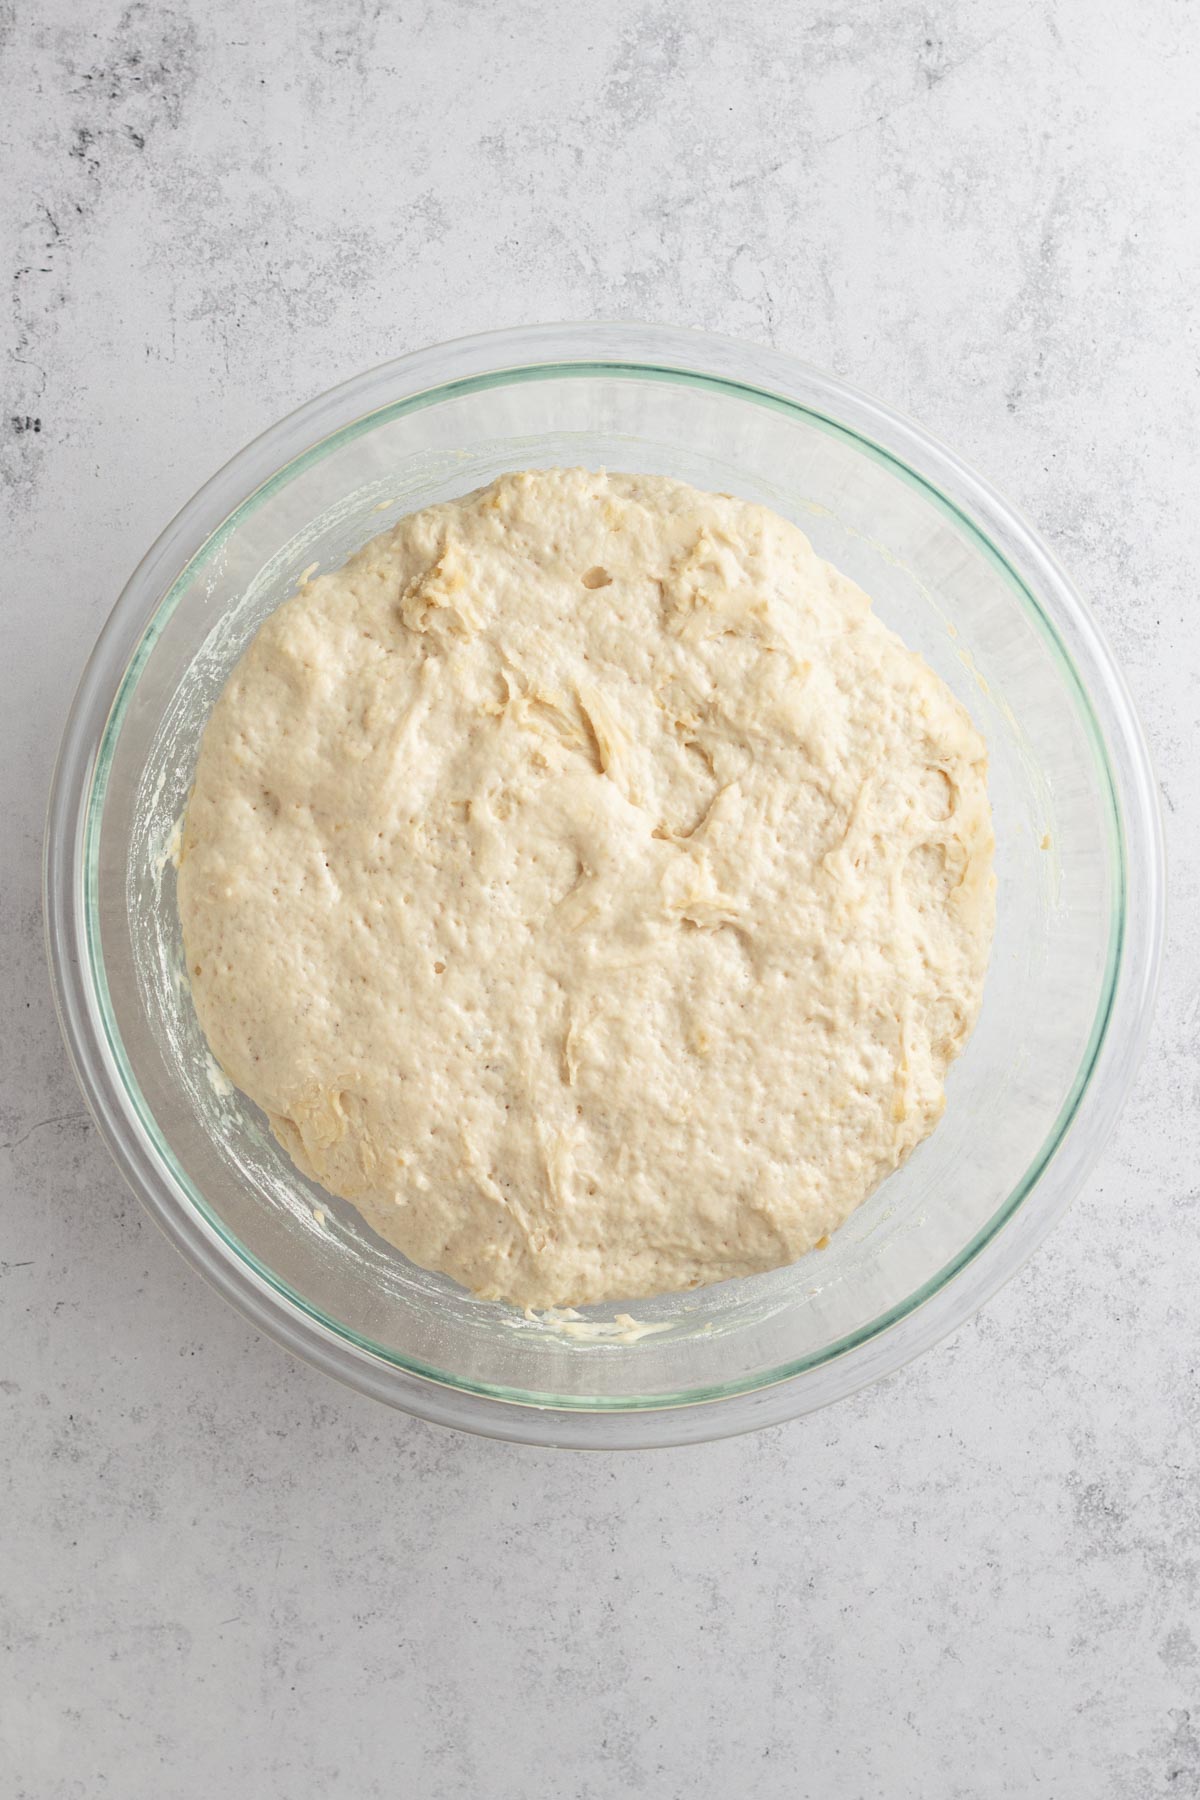
- Cover the bowl with a clean dish towel. Let the dough rise at a warm room temperature for 1.5-2 hours. The dough will rise to at least double its size and then flatten out on top.
- Optional: Refrigerate the dough for at least 1 hour before making the buns. (Read more about this step under Recipe Tips below).
Make the Pizza Buns
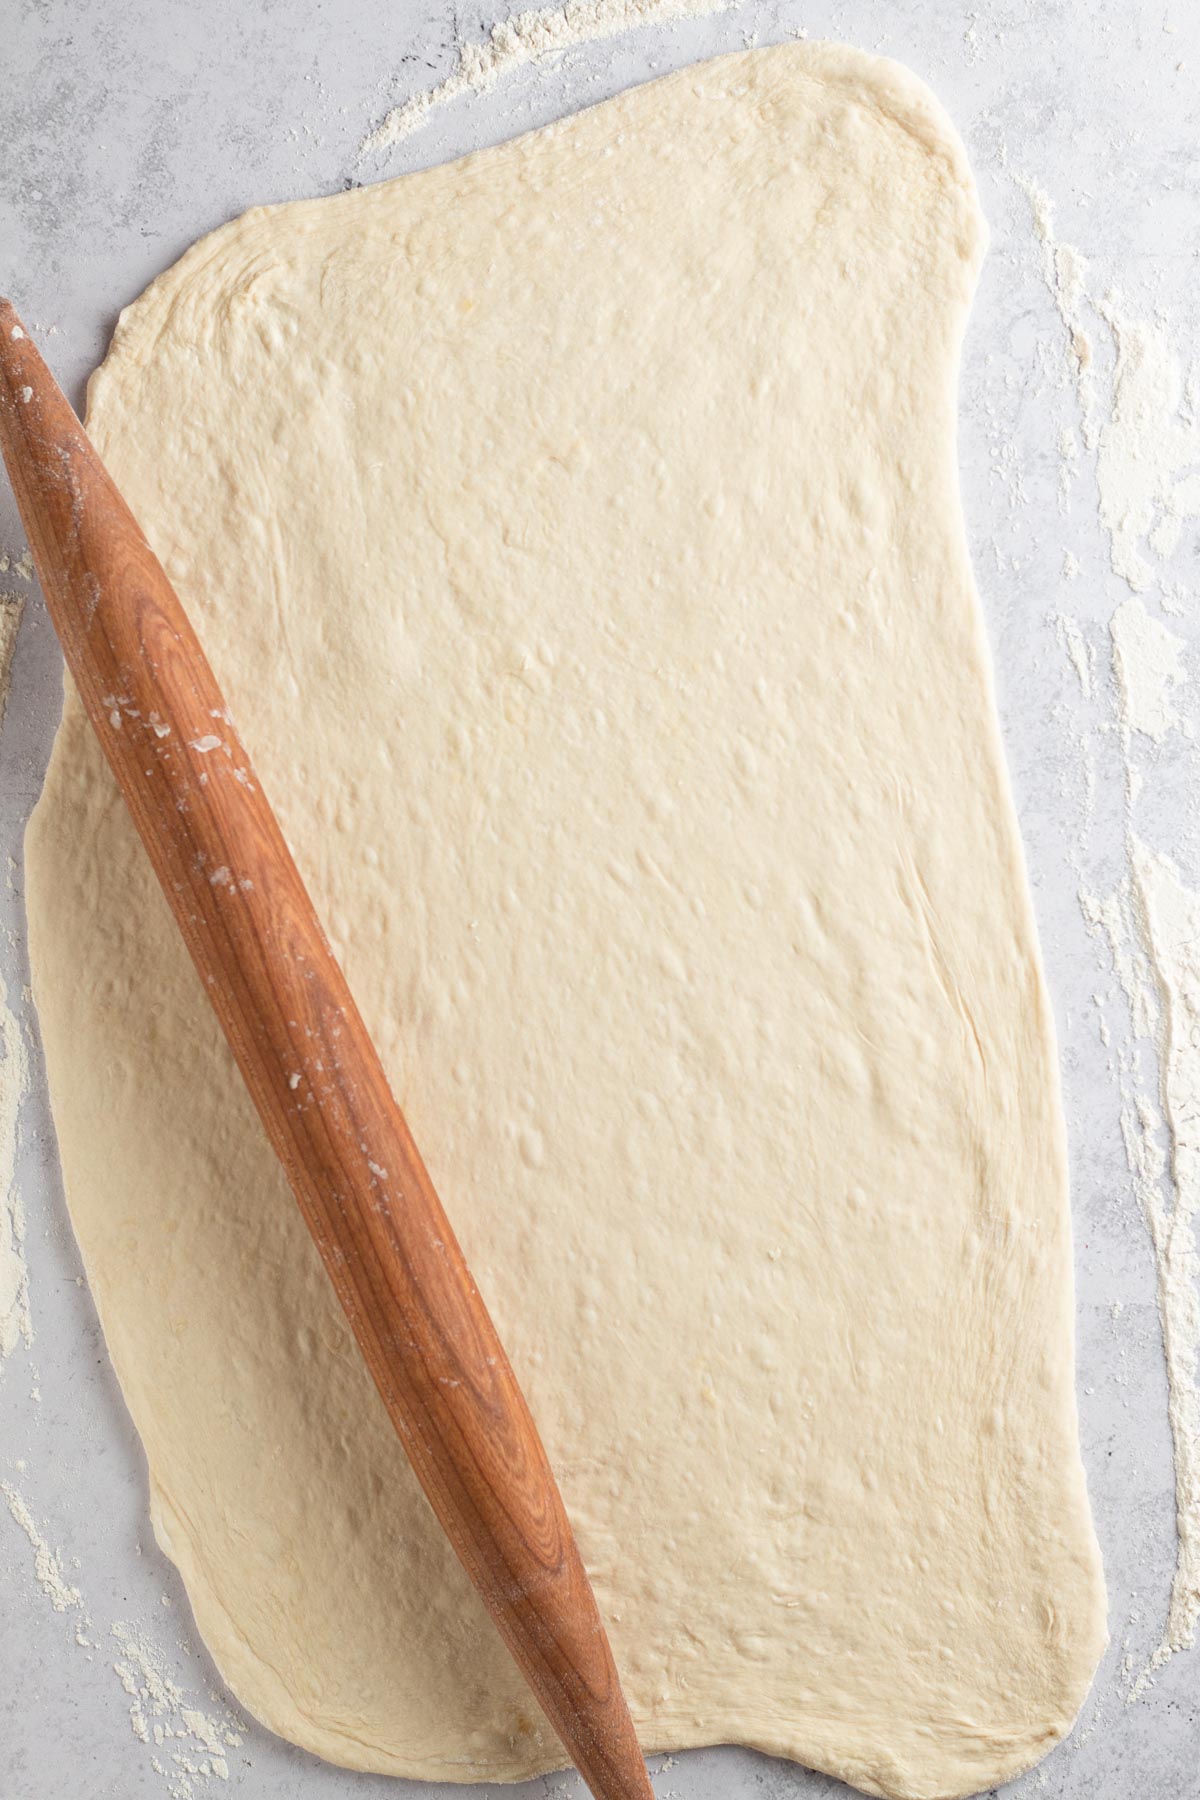
- Place the pizza dough onto a floured surface and use a rolling pin to roll the dough into a 12 inch x 18 inch rectangle.
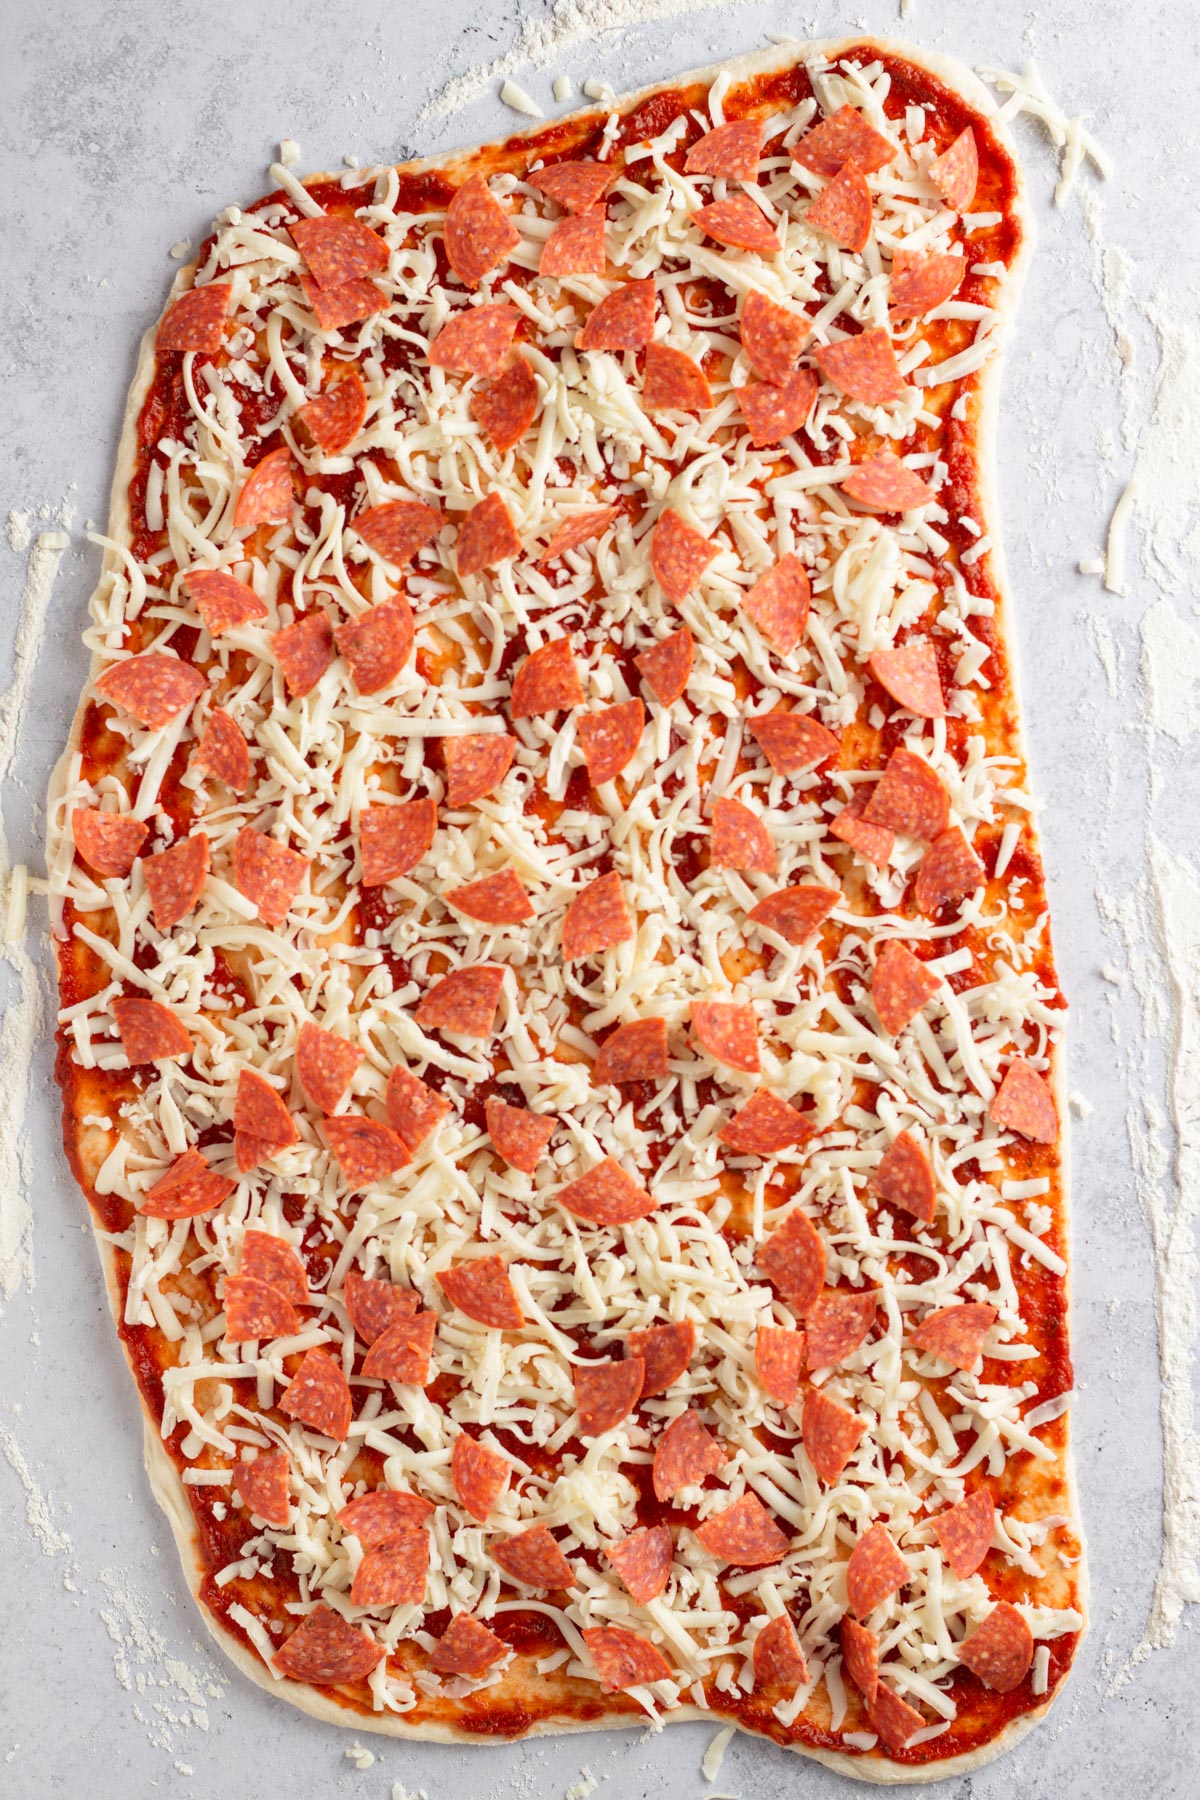
- Spread the pizza sauce over the dough and top with cheese and pepperoni.
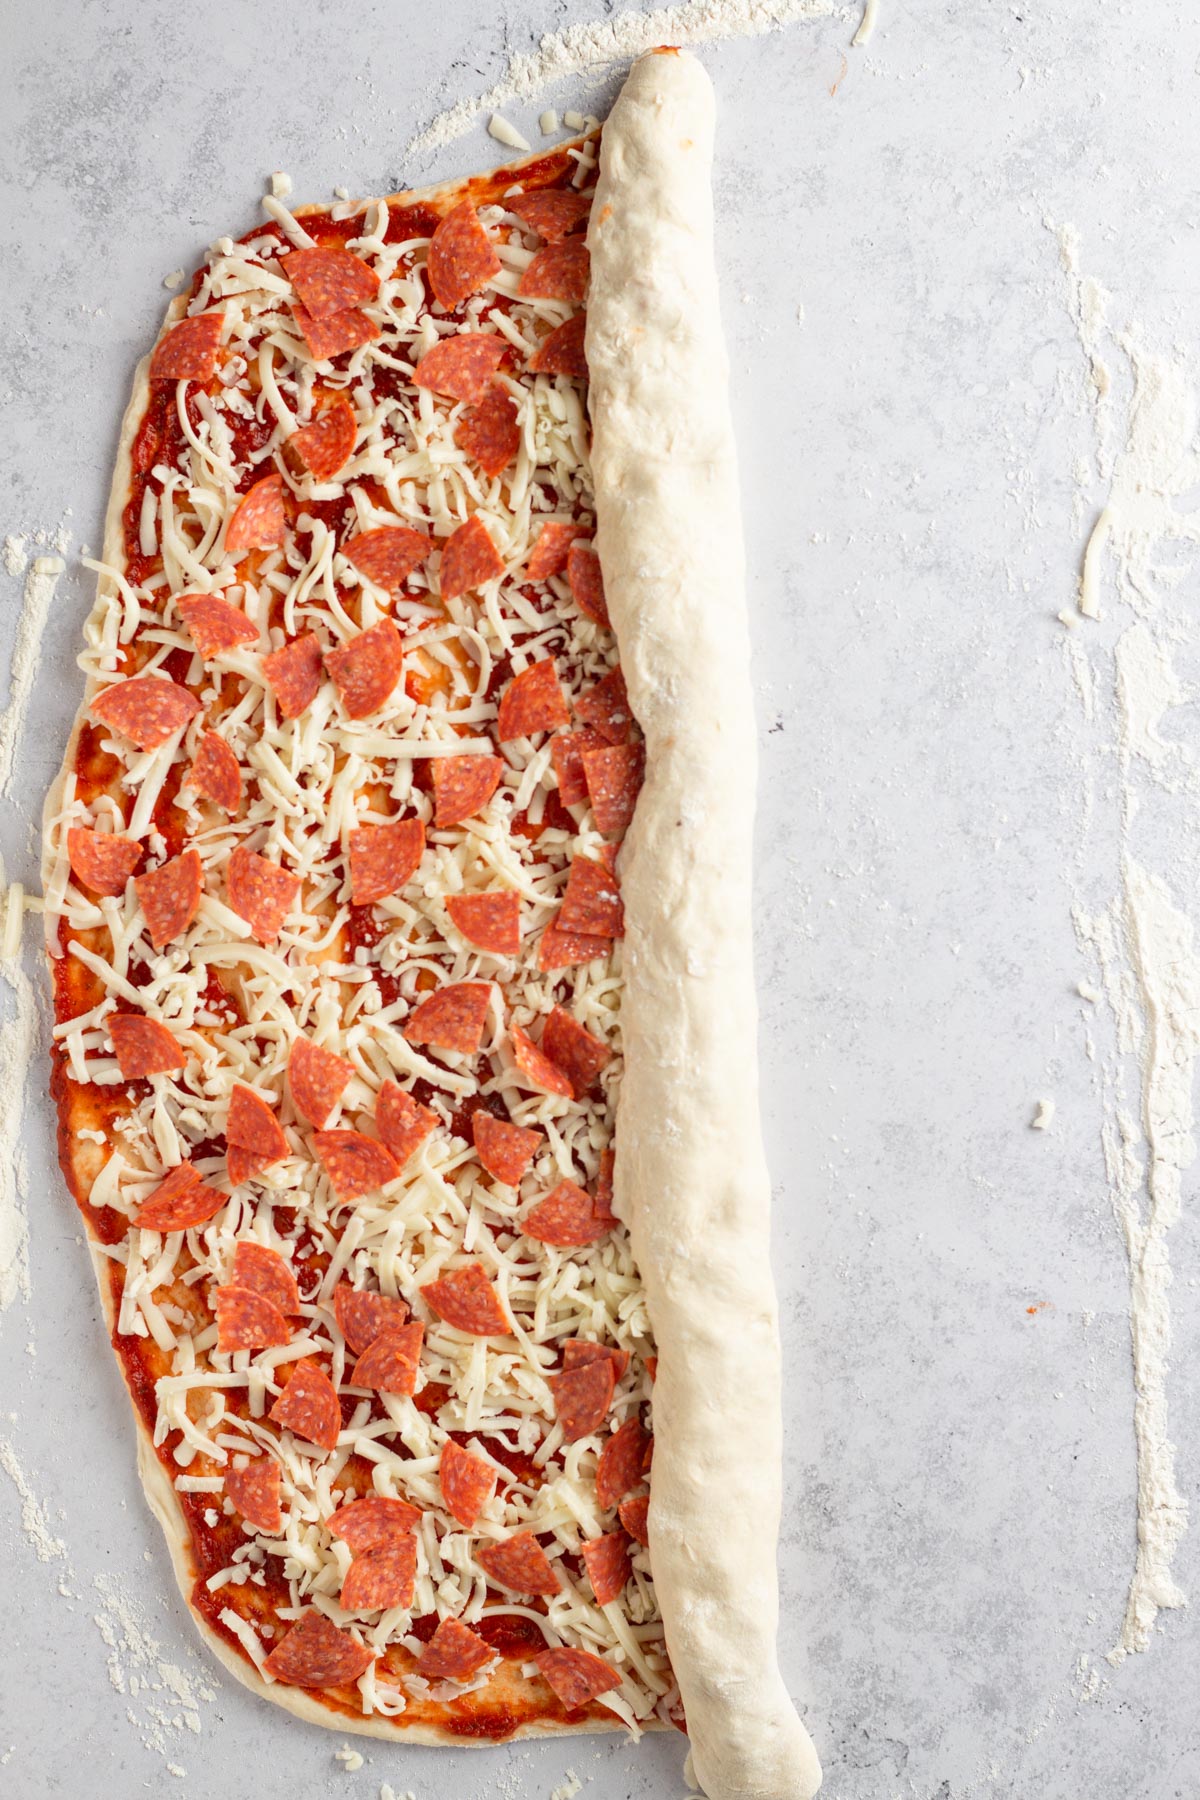
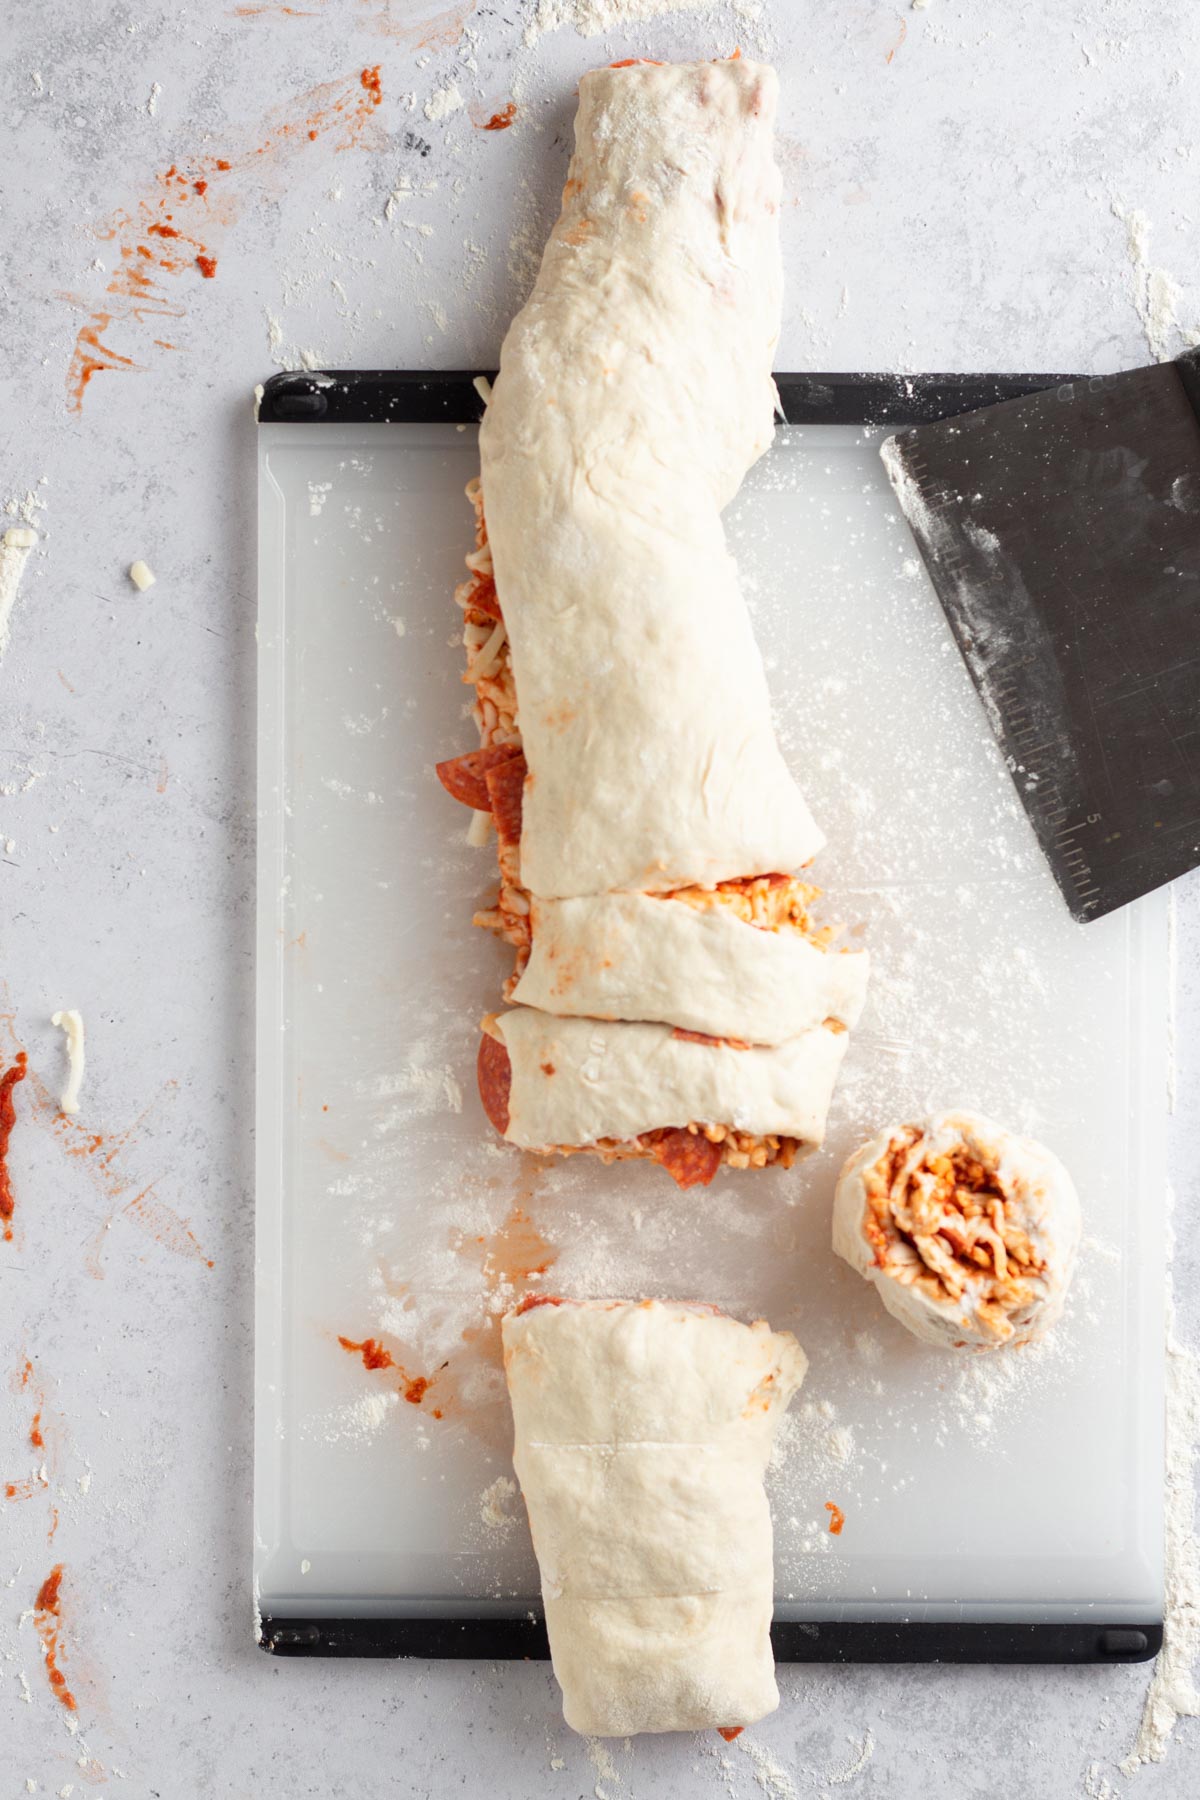
- Beginning at one of the long edges of the rectangle, roll the dough into a log.
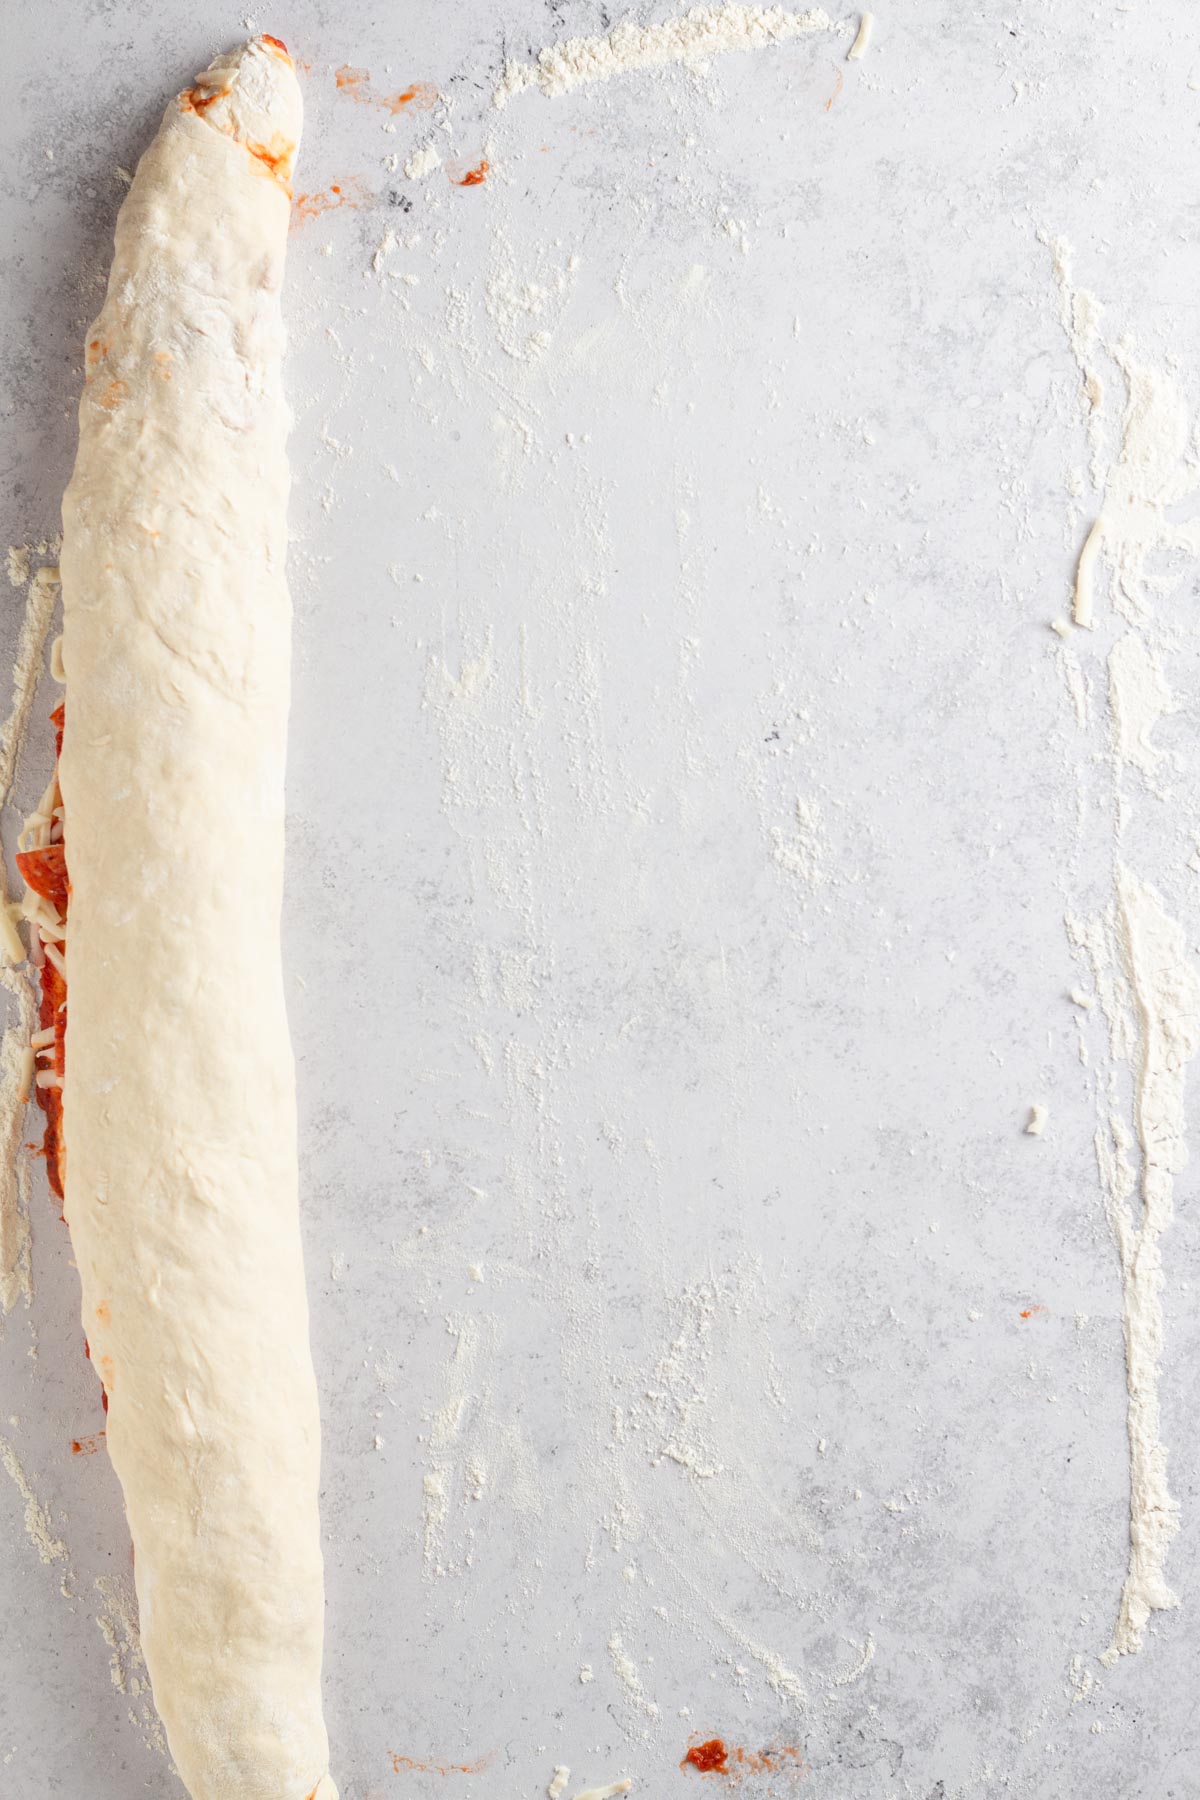
- Make vertical slits in the log every 1.5 inches to cut the log into 12 pieces. Use a sharp knife and a gentle sawing motion to slice the log without squishing the buns.
- Place each bun cut side up on a parchment-lined baking sheet, leaving an inch or so between each bun.
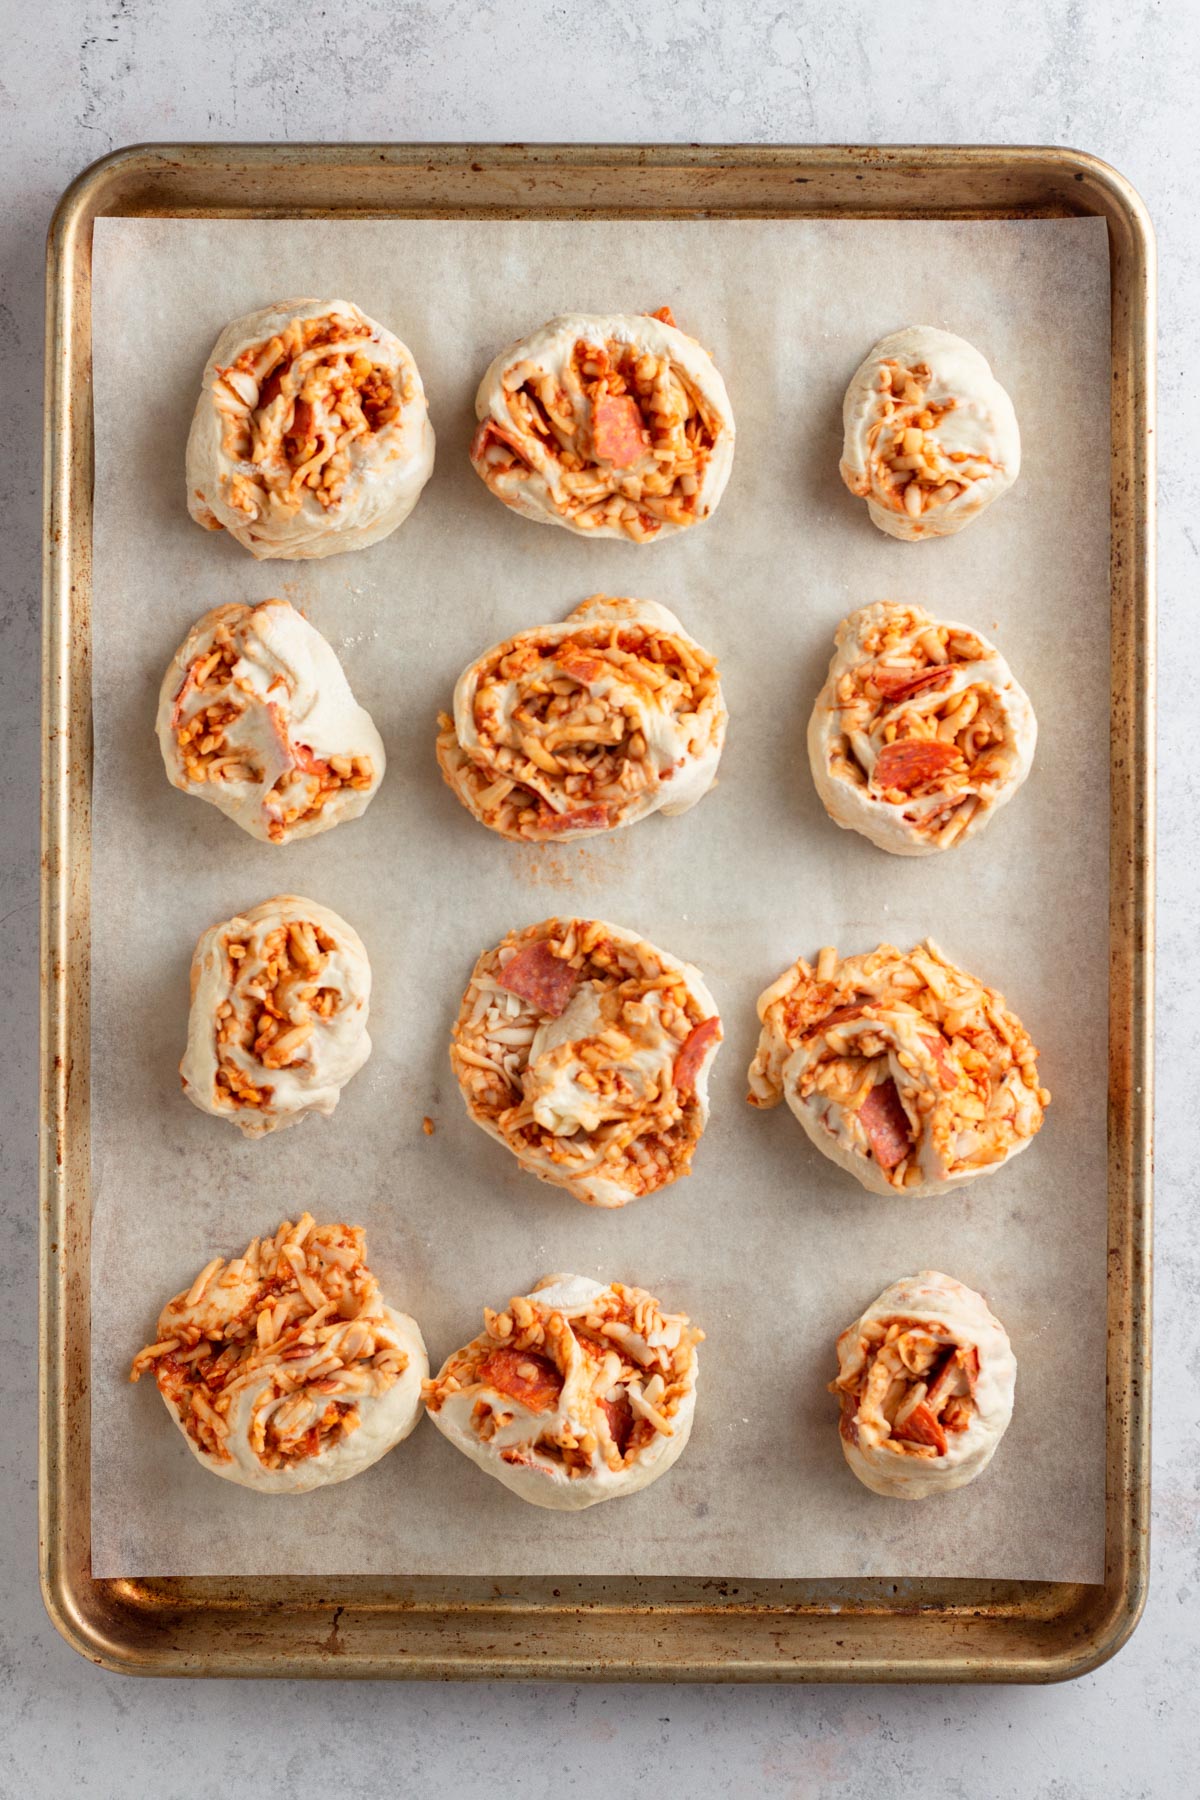
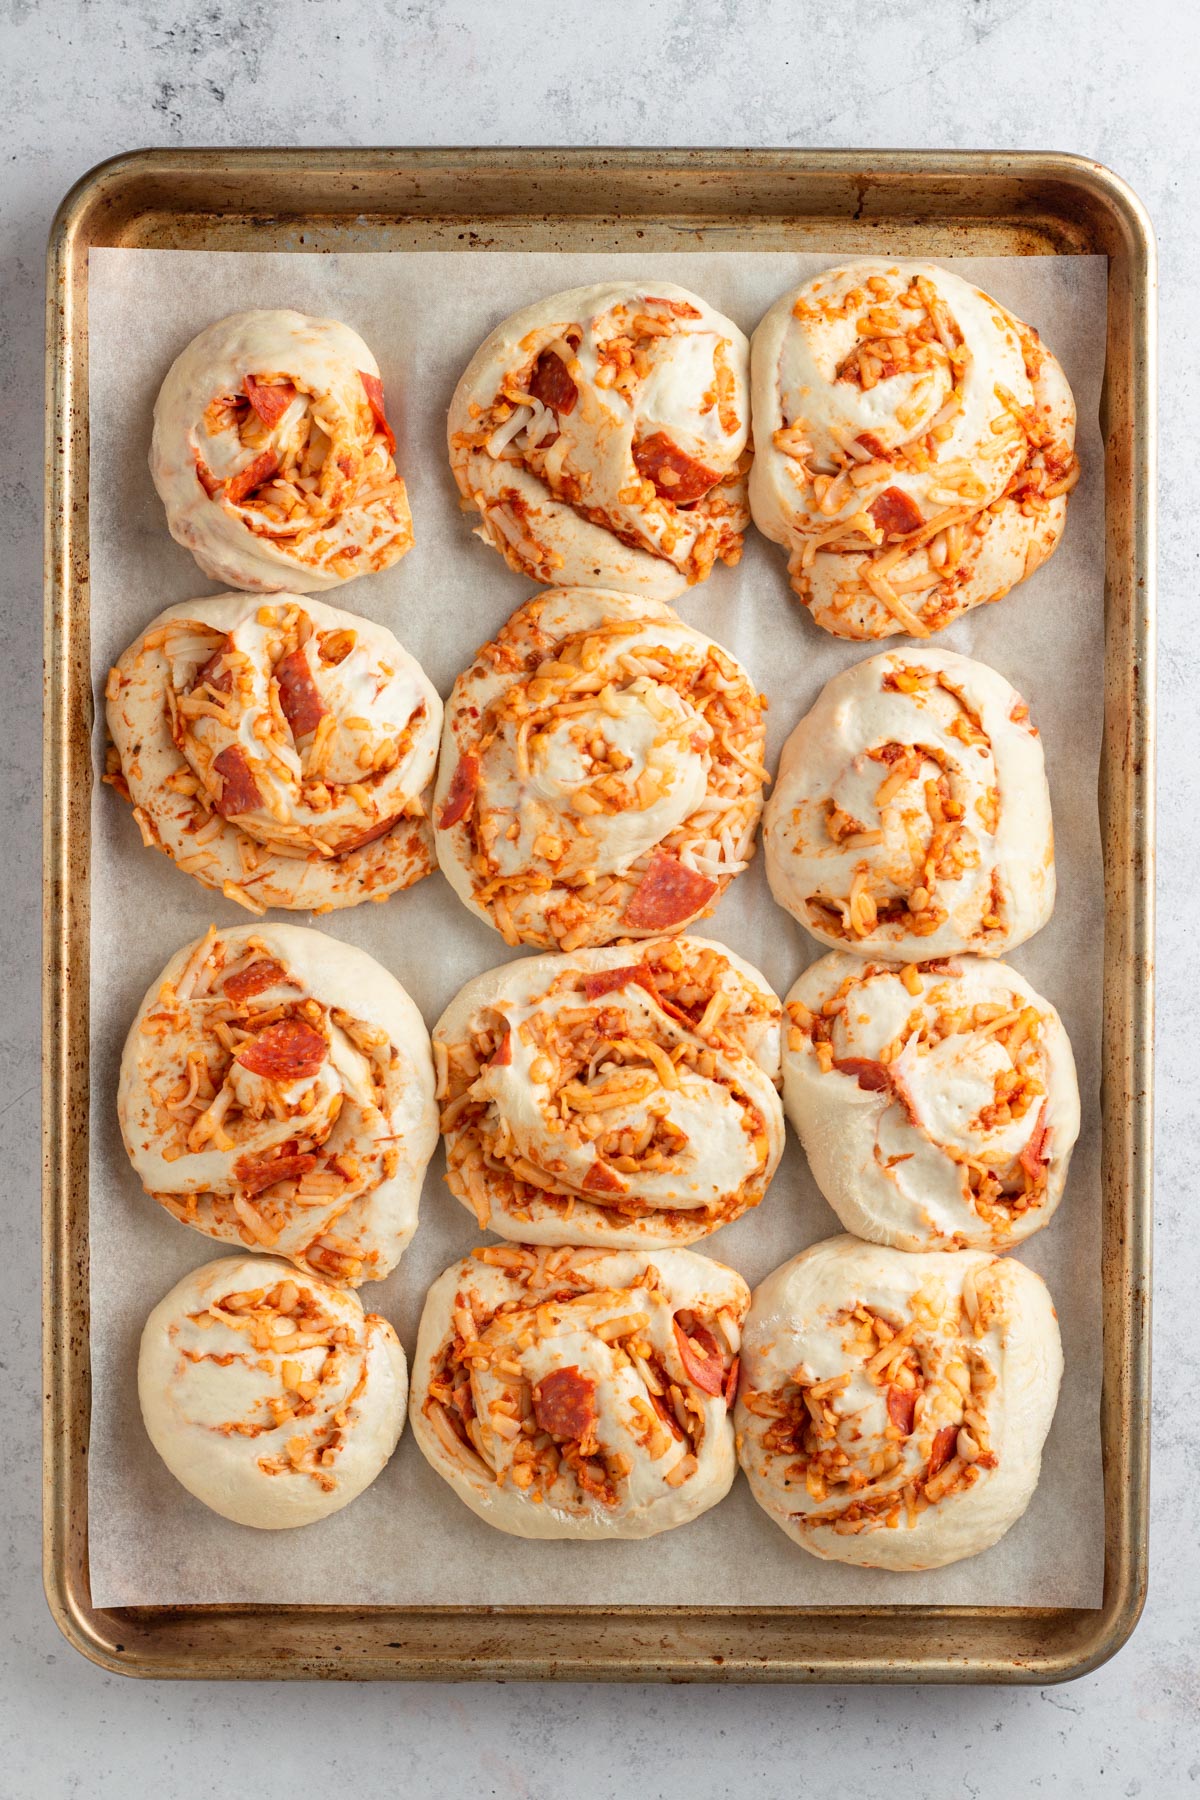
- Cover the tray with the dish towel used earlier and place the tray in a warm spot to rise for 90 minutes. The buns are finished rising when they become puffy. Preheat the oven to 350°F about 15 minutes before the buns finish rising.
Bake the Buns
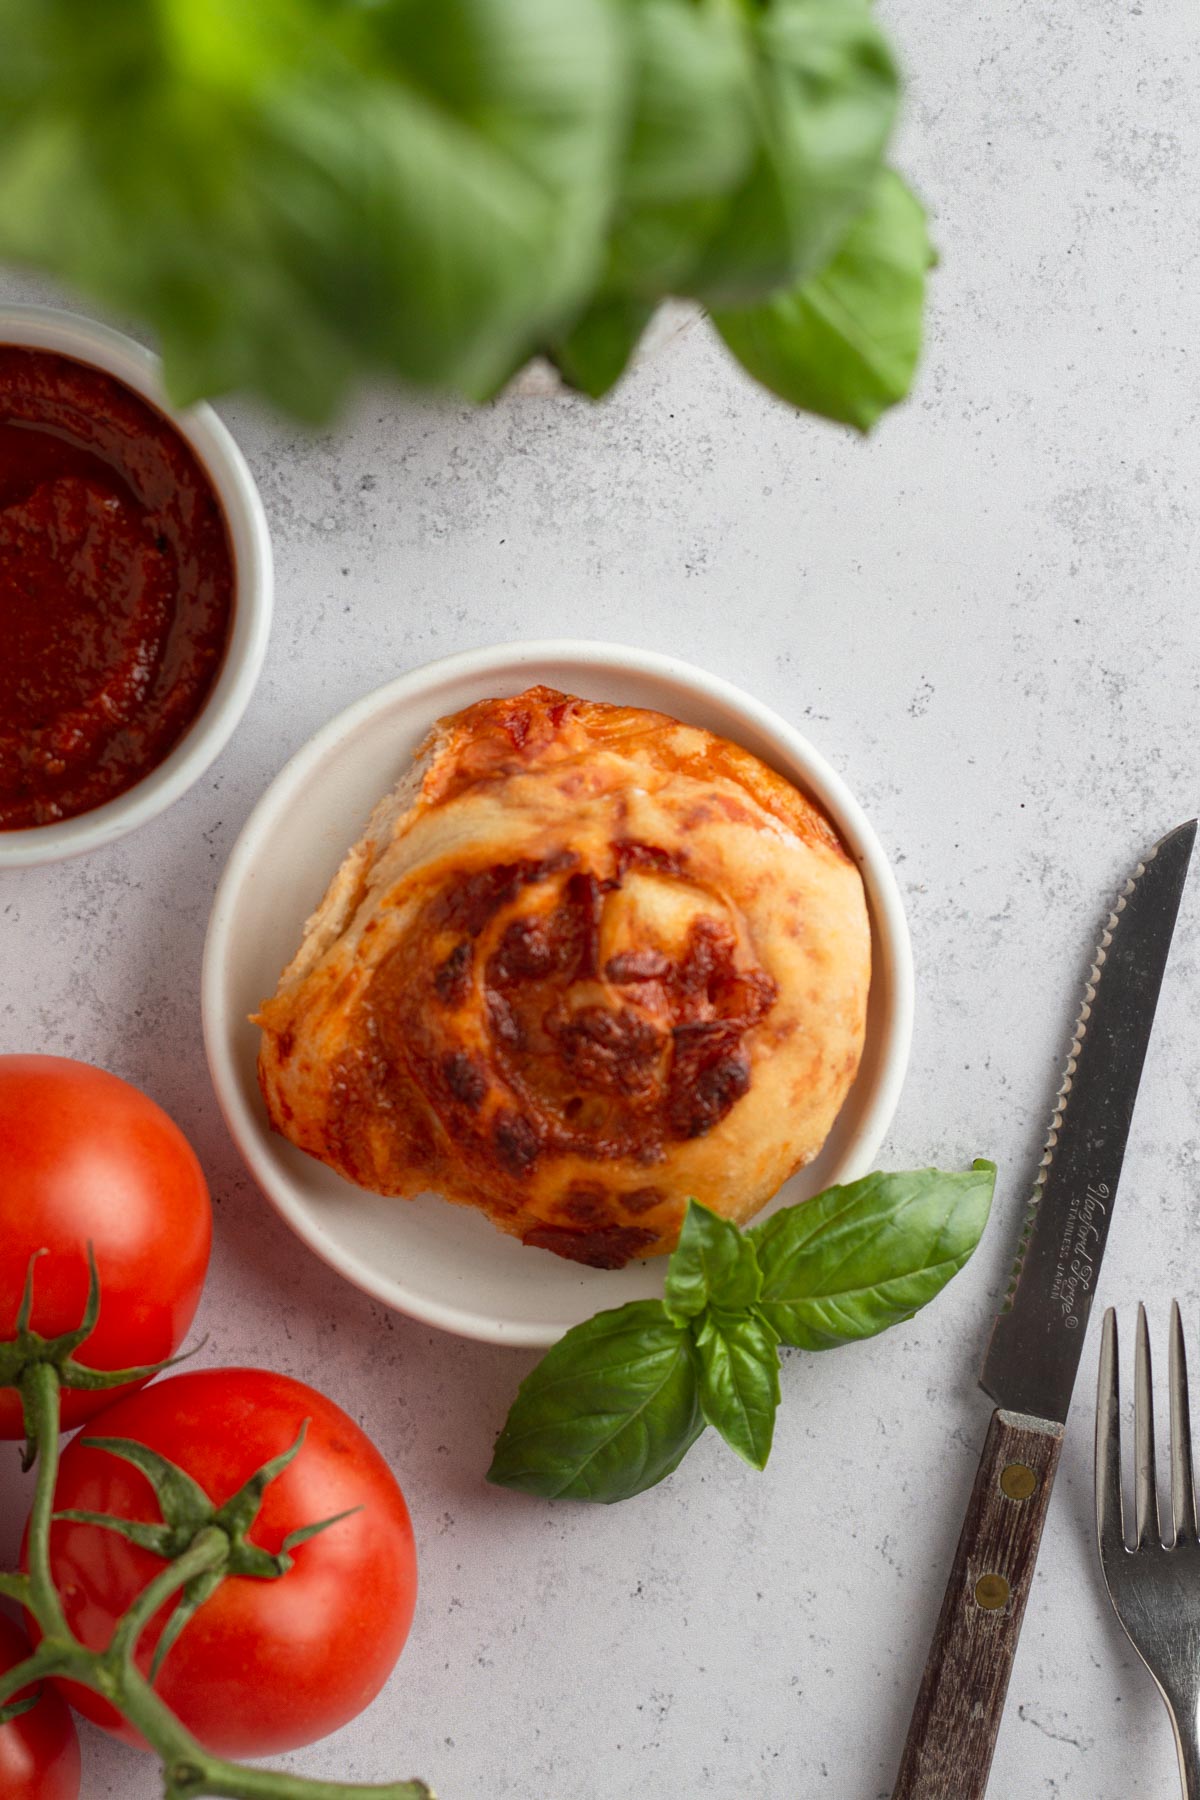
- Bake the buns in the preheated oven for 30-35 minutes, until the pizza crust becomes golden all over.
- Serve the buns hot with extra pizza sauce for dipping.

Pizza Bun Toppings
I opted for classic sauce, cheese, and pepperoni for these pizza buns, but you could stuff your buns with your favorite pizza toppings, such as:
- Parmesan cheese
- Fresh mozzarella cheese (cut into small cubes)
- Sausage (cooked and crumbled)
- Sautéed mushrooms (like in my recipe for Mushroom and Fontina Calzone)
- Sliced olives
- Bell peppers (diced)
- Banana peppers (sliced)
- Garlic (minced)
- Fresh basil
- Onion (diced)
- Bacon (cooked and crumbled)
Allison's Top Tips
I like to refrigerate the dough after the first rise and before rolling it out because I find that it's easier to work with. That said, this step is optional and can be skipped if you prefer or if you're short on time.
When slicing the log of pizza dough, I find that a sharp, un-serrated chef's knife works best. (NOTE: I love to use this dental floss trick for slicing cinnamon rolls, but it doesn't work well when the dough is stuffed with pizza toppings like pepperoni.)
Recipe FAQs
Pizza buns taste best when freshly baked, but the pizza dough can be made ahead of time, saving you time when you are ready to bake. Follow the recipe instructions for making the dough through the first (step #3), then cover the bowl of dough loosely with a lid or plastic wrap and refrigerate for up to one week. When you're ready to bake, remove the dough from the fridge and pick up with the recipe instructions for making the pizza buns.
If you do want to bake the pizza buns ahead of time (or you find yourself with leftovers), baked buns can be stored in an airtight container in the fridge for up to 5 days. Simply reheat in the oven before serving.
The same thing that gives pizza crust its delightfully chewy texture - gluten - is what causes dough to shrink back when we're trying to roll it out. That elasticity is actually a good thing, because it means delicious pizza is on the way! Chilling the dough after it rises and before rolling it out will make it easier to roll. A bit of patience and using your hands to gently stretch (but not tear) the dough may help, too. And if the dough is still driving you nuts, let it come back to room temperature after chilling before rolling, since gluten strands can be tighter when chilled.
Pizza dough that is left to rise for several hours will become over-proofed. When this happens, the air bubbles in the rising dough have popped and the gluten has weakened, causing the ball of dough to collapse. The over-proofed dough will not rise properly during baking, leading to a gummy pizza crust.
More Yeast Dough Recipes
Love this recipe? Please leave a star rating and review on the recipe below! And don't forget to subscribe to Always Eat Dessert for even more easy dessert recipes and helpful baking tips.
Recipe
Homemade Pizza Buns
Ingredients
Pizza Dough (makes about 2 pounds of dough):
- 1 ⅜ cups (325 grams) lukewarm water
- 1 ½ teaspoons (18 grams) active dry yeast
- 1 ½ teaspoons (6 grams) granulated sugar
- 1 ½ teaspoons (9 grams) salt
- 2 Tablespoons (28 grams) olive oil
- 3 ¼ cups (406 grams) all-purpose flour
Pizza Buns:
- ½ cup (122.5 grams) pizza sauce (plus more for serving)
- 12 ounces (340 grams) mozzarella, grated (about 3 cups grated cheese)
- 3 ounces (85 grams) pepperoni, chopped (about ¾ cup chopped pepperoni) (optional)
Instructions
Make the Pizza Dough
- In a large bowl, combine the water, yeast, sugar, salt, and olive oil.
- Add the flour and gently mix using a wooden spoon.
- Cover the bowl with a clean dish towel. Let the dough rise at a warm room temperature for 1.5-2 hours. The dough will rise to at least double its size and then flatten out on top.
- Optional: Refrigerate the dough for at least 1 hour before making the buns.*
Make the Pizza Buns
- Place the pizza dough onto a floured surface and use a rolling pin to roll the dough into a 12 inch x 18 inch rectangle.
- Spread the pizza sauce over the dough and top with cheese and pepperoni.
- Beginning at one of the long edges of the rectangle, roll the dough into a log.
- Make vertical slits in the log every 1.5 inches to cut the log into 12 pieces. Use a sharp knife (I found a sharp, un-serrated chef's knife to be best) and a gentle sawing motion to slice the log without squishing the buns.
- Place each bun cut side up on a parchment-lined baking sheet, leaving an inch or so between each bun.
- Cover the tray with the dish towel used earlier and place the tray in a warm spot to rise for 90 minutes. The buns are finished rising when they become puffy. Preheat the oven to 350°F about 15 minutes before the buns finish rising.
Bake the Pizza Buns
- Bake the buns in the preheated oven for 30-35 minutes, until the pizza crust becomes golden all over.
- Serve the buns hot with extra pizza sauce for dipping.


Tyler Morgan says
Just loved your topping ideas! I like to keep it classic too or just add a few extras—otherwise overloading can make it even harder to bake evenly.
Lina says
If I choose to make the dough ahead of time and refrigerate it, at what stage can I place it in the fridge? Can I put them in the fridge after u have filled and cut the rolls? Say in the morning and then take them out for dinner? Thank you xx
Allison Ferraro says
Hi Lina! You can absolutely make the dough in advance! The recipe notes that I recommend letting the dough chill in the fridge for at least an hour (and up to a week) before rolling it out and assembling the rolls. I have not tested assembling the rolls ahead of time, but I do imagine that you could. If you want to give it a try, I'd suggest assembling them in the morning, skipping the rise right after assembling and then letting them to a slow rise in the fridge. Check on them an hour or two before you wish to bake in case you decide they need more time to rise at room temperature before baking. If you decide they've risen sufficiently in the fridge, let them sit at room temperature for about 30 minutes before baking. If you do give this a try, please let me know how it goes!
- Allison
Nora says
Oh my goodness - these buns are so easy to make and delicious! The only change I made was add 1/2 tsp of Italian seasoning to the dough. Thanks for sharing - this recipe is definitely a keeper!
Allison Ferraro says
Thank you so much for your review, Nora! I love your idea to add Italian seasoning to the dough.
- Allison